Why Rear Brake Pads Rub and What You’re Actually Hearing
Rear brake pads rubbing on the rotor has gotten complicated with all the internet advice flying around. I spent three seasons ignoring a rubbing rear brake on my gravel bike before learning the difference between mechanical drag and actual system failure — and that mistake cost me a rotor replacement I could have prevented.
But what is brake rub? In essence, it’s pad material contacting the rotor during wheel rotation. You hear it every revolution. Squeal is different — it’s friction noise without necessarily touching. The distinction changes your whole diagnostic approach.
Three primary causes account for nearly every rear brake pad rubbing complaint. Caliper misalignment sits at the top of the list: the caliper body shifts slightly off-center and one pad sits closer to the rotor than it should. Then there’s rotor warping, where the disc bends just enough that pads contact it even when the caliper sits perfectly centered. Finally, pad knock-back happens when piston seals pull pads slightly away from rotors between stops, causing one pad to rest heavier than the other.
Most riders assume warping immediately. Most mechanics reach for the alignment wrench first. The truth usually sits in between — and that’s what makes systematic diagnosis endearing to anyone who actually wants to fix this instead of guessing.
The Fast Check You Do Before Touching Tools
Probably should have opened with this section, honestly.
Spin the wheel by hand slowly while the bike sits upright in a stand. Listen carefully. A good rotor produces near-silence. A rubbing pad produces a consistent scraping or dragging sound every rotation — same spot every time.
Feel for the rub next. Your fingertips can detect brake drag that your ears miss. Spin the wheel and hold your hand near (not touching) the rotor edge. You’ll feel heat and air movement if pads are dragging.
Now perform the squeeze test — this separates caliper misalignment from rotor warping in about ten seconds. With the wheel still spinning, gently pull the brake lever. Just enough to add friction, not full pressure. A perfectly centered caliper will immediately slow and stop the wheel smoothly. A misaligned caliper will catch harder on one side, creating resistance that feels uneven. A warped rotor will show inconsistent resistance as different sections pass through the pads.
Pay attention to pressure needed. If the brake grabs immediately without smooth engagement, the caliper is probably misaligned. Gradual wheel slowdown with consistent resistance usually means the rotor is warping.
One more detail: check the brake lever position. If your lever sits higher or lower than the front brake lever when fully released, that’s often a symptom of piston seals pulling unevenly. Shimano rear calipers especially develop this behavior after 2,000 to 3,000 miles of use — I’m apparently someone these brakes punish, and this trick works for me while ignoring it never does.
How to Realign a Rubbing Rear Caliper
Caliper alignment fixes ninety percent of rubbing complaints.
You’ll need a 5mm hex wrench for most road and gravel calipers. Mountain bikes with larger calipers sometimes require 6mm. The two bolts mounting the caliper to the frame are your target — they’re usually hidden slightly below the rotor centerline.
Loosen both mounting bolts three-quarter turns only. Don’t fully remove them. You want the caliper to shift slightly, not flop around. Spin the wheel again. The caliper will naturally move toward centered position under the slight drag of the pads.
Once the wheel spins with even resistance, squeeze the brake lever firmly while the wheel is stationary. Hold that pressure. Tighten the upper mounting bolt first — snug, not crushed (roughly 70-90 Newton-meters for road calipers, less for mechanical brakes). Then tighten the lower bolt while maintaining brake pressure.
The brake lever squeeze while tightening is critical. It centers the pads against the rotor before the caliper becomes rigid again. Release the lever and spin the wheel. The rub should be gone or dramatically reduced.
For precision work on Shimano hydraulic calipers specifically — the 105 R7070 and higher-end road models — a feeler gauge trick helps. Insert a 0.15mm shim (thin plastic or aluminum) between the inner pad and rotor while torquing bolts. This prevents the inner pad from sitting too close. Remove the shim before riding.
SRAM and Magura calipers follow the same principle but often have slightly wider tolerances. Mechanical brakes — cantilever or V-brake conversions on some gravel setups — need the same alignment procedure but respond more quickly to small adjustment.
Checking and Truing a Warped Rotor
Still hearing rubbing after caliper realignment? That’s when warping becomes the suspect.
Visual check first. Hold the rotor edge at eye level against a light source. Rotate it slowly. A truly flat rotor shows no variation in distance from your eye to the edge. A warped rotor shows the edge moving closer and further as it rotates — sometimes just 0.2 to 0.5mm, enough to cause rubbing.
The tool method requires a rotor truing tool (Park Tool RTS-1 is standard, around $85-110) or an improvised spacer using a stiff piece of plastic. With the rotor still in the frame, use the tool to detect high spots by spinning slowly while the tool contacts the rotor surface. Hydraulic caliper frames often give you enough clearance to fit a truing tool without removing the rotor. Mechanical systems sometimes require rotor removal.
Truing a rotor takes patience. Cold-set the rotor first by bending against the tool slightly — don’t crank hard. Most rotors are aluminum-backed steel or full aluminum, not rigid enough for aggressive correction. Small, consistent adjustments work. A few millimeters of bend correction per rotation, repeated 3-4 times, often fixes warping completely.
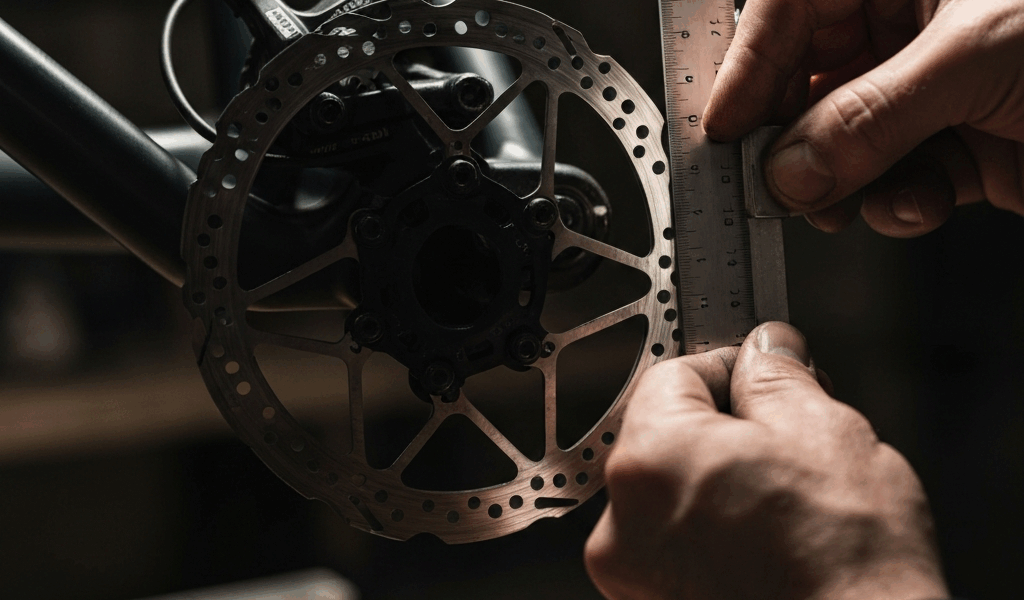
Know your limits though. Rotor warping beyond 0.3mm is difficult to true without professional equipment. More importantly: check rotor thickness. Most hydraulic road rotors spec out at 1.75mm minimum thickness. Mountain bike rotors run 1.9-2.0mm minimum. Measure with calipers at multiple points around the rotor. If you’re at minimum thickness after measuring, don’t true further — replacement is safer.
A warped rotor that’s also below thickness minimum isn’t fixable at home. Full replacement costs $25-65 depending on model.
When the Rub Means You Need New Parts
Sometimes brake rubbing tells you something deeper is failing.
Worn brake pads lose bedding consistency. They won’t sit firmly against the rotor and develop uneven contact — causing rubbing specifically at certain wheel positions. If your pads are below 1.5mm thickness (measure at the thinnest point), replacement solves the rub. Shimano pads run $15-30 per pair. SRAM mechanical pads are similarly priced.
Hydraulic caliper piston seals fail in weird ways. A seal that’s deteriorating pulls pistons unevenly, creating knock-back imbalance. You’ll notice the brake lever position drifts or the rub gets worse over days. Bleeding the system sometimes helps temporarily. Full seal replacement requires caliper service kits ($20-40) or caliper replacement ($80-150 per caliper).
Rotor thickness below minimum is non-negotiable. A rotor at 1.7mm thickness with visible rubbing should be replaced, not adjusted further. Pushing rotor thickness below spec increases stopping distance and brake fade risk.
Real talk: if you’ve realigned the caliper twice, trued the rotor once, and the rub persists — don’t make my mistake. You’re past the adjustment phase. That’s the point where new pads or a new rotor is the right move, not endless tweaking.
Measure rotor thickness properly. Place caliper jaws on the rotor, measuring at the thinnest worn section (usually near pad contact zones). Write down the number. Compare to your rotor’s spec — printed on the rotor back or in your bike’s manual. If actual thickness is 0.1-0.2mm above minimum, you’ve got adjustment room. Below that, replacement is the answer.
Most rear brake rubbing issues resolve with caliper realignment and basic diagnostics. Keep the troubleshooting systematic: alignment first, then warping detection, then parts assessment. Your hands and ears are better diagnostic tools than most mechanics give them credit for.

Stay in the loop
Get the latest bike maintenance pros updates delivered to your inbox.