Why Your Cassette Is Stuck in the First Place
Bike maintenance has changed quite a bit thanks to the conflicting advice flying around. But a stuck cassette? That one’s personal. I’ve stood in my garage at 6 p.m. on a Sunday — wheel clamped in the stand, lockring feeling like it was welded shut — wondering if I’d ever get the thing off without destroying something expensive.
Before you strip the notches or send the wheel across the room, you need to know what actually caused this. Three culprits account for nearly every stuck cassette I’ve run into.
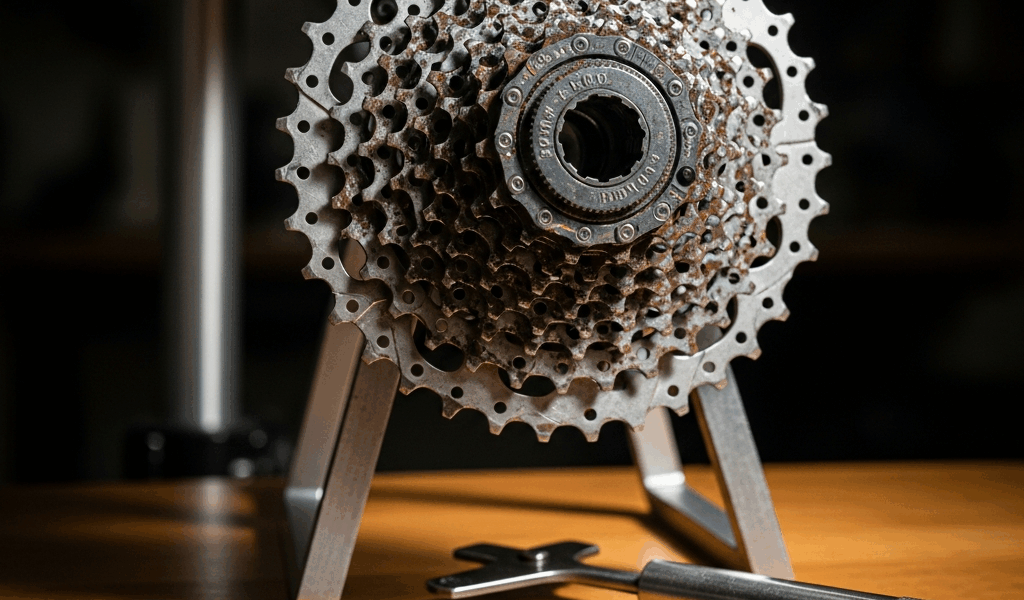
Corrosion is the most common. The cassette sits on an aluminum freehub body. The cassette itself is steel. Water settles into that gap. Over months — or years, especially near saltwater or in wet conditions — galvanic corrosion bonds them together. The lockring tightens on its own over time. You assume it’s over-torqued. It isn’t. It’s oxidized. Completely different problem, completely different fix.
Over-torquing comes second. A previous mechanic, yourself, or someone at the shop cranked that lockring too hard. Maybe they used a power tool. Maybe they didn’t trust the spec sheet. Shimano lockrings should sit at 40 Newton-meters. Not 50. Not 60. The aluminum freehub body will yield before the steel lockring does — so now the lockring is fine, but the freehub splines are stripped or damaged. Congrats, you’ve reversed the problem.
Wrong tool engagement is the silent killer. You grabbed what looked like the right cassette lockring remover. Close. Almost right. But not quite. Maybe it’s a size too small. Maybe you didn’t seat it fully. Maybe the notches on the lockring are already worn from someone else’s mistake. You apply pressure. The tool rounds the notches instead of turning them. Now nothing grips properly. That’s when people start throwing things.
Diagnosis saves time. Is the lockring actually turning, but the cassette body is stuck to the freehub? Corrosion. Does the lockring feel like someone previously attacked it with a pipe wrench? Over-torque. Can’t get the removal tool to seat and grip the notches? Tool mismatch or worn notches. Know which one you’re dealing with before you touch anything.
Tools You Actually Need for This Job
Wrong tools turn a 20-minute job into a trip to the bike shop. I learned this the hard way — used a generic cassette tool that fit “close enough” on a Shimano HG cassette. It wasn’t close enough. Twenty minutes later, I had a rounded lockring and a very limited vocabulary. Avoid the path I took.
While you won’t need a full workshop setup, you will need a handful of specific tools. Get the right removal tool first. This is non-negotiable. Shimano HG cassettes need the Shimano HG lockring tool — the TL-LR15 or a direct equivalent. SRAM XD cassettes need the XD-specific tool. Campagnolo needs Campagnolo. They are not interchangeable. Look at your cassette. Count the speeds. Check the brand. Order the correct tool. A decent one runs $12 to $25. A ruined cassette runs $60 to $150. Do the math.
You also need:
- A chain whip or cassette holder to stop the cassette from spinning while you work the lockring
- A large adjustable wrench or a breaker bar to fit the removal tool and give you real leverage
- Penetrating oil — Liquid Wrench, PB Blaster, or 3-in-1 oil all work
- A wire brush to scrub corrosion off the notches
- The rear wheel removed from the bike
Important part first — having the right tools solves maybe 40% of stuck cassette problems before you even start wrenching.
Step-by-Step How to Remove a Stuck Cassette
Remove the rear wheel from the bike and clamp it in a workstand. Spin the wheel to position the lockring where you can see it clearly. Takes 30 seconds. Saves you wrenching at an awkward angle for 10 minutes.
Step one: Apply penetrating oil. Spray or drip penetrating oil around the perimeter of the lockring where it meets the freehub body. Work it into the gap. Let it sit for at least 10 minutes. If the cassette feels extremely stuck — if you’ve already tried and failed — let it soak overnight. Patience here is free. Wrenching effort isn’t.
Step two: Brush away surface corrosion. Use a wire brush on the lockring notches and the freehub splines visible around the cassette. Get the flaking aluminum oxide and rust off. This helps the removal tool seat properly and shows you what you’re actually dealing with.
Step three: Seat the removal tool fully. Push the cassette lockring remover onto the lockring notches. It should sit flush — no gaps, no wobble. Wiggle it slightly to make sure all the notches are engaged. If it doesn’t seat all the way down, you have the wrong tool. Stop. Get the correct one.
Step four: Lock the cassette and turn the lockring. Place the chain whip on the cassette cog teeth — usually the largest sprocket, but check your specific setup. Pull the chain whip away from you to hold the cassette in place. With your other hand, fit the adjustable wrench onto the removal tool. Turn counter-clockwise. Steady pressure. This is not arm wrestling. It should move within 30 seconds of firm, consistent torque.
Step five: If it still won’t budge, use a breaker bar. Swap the adjustable wrench for a longer breaker bar through the removal tool. The extra leverage usually breaks the initial resistance. Tap the breaker bar gently with a rubber mallet if needed — the vibration sometimes convinces corrosion to release. Gently. Don’t hit it hard. Rounded notches are a whole other problem.
Step six: Once it moves, unscrew it by hand. After the initial break-free, the lockring usually loosens fast. Once you can turn it by hand, finish without tools. Cross-threading or stripping splines at the finish line would be a brutal way to end this.
What to Do When It Still Won’t Budge
Sometimes steps one through six fail. Corrosion was worse than it looked. The freehub body is damaged. The lockring notches are already partially stripped. It happens.
Heat application works occasionally. A heat gun — not a blowtorch, I’m serious — can expand the aluminum freehub body slightly and break corrosion bonds. Direct the heat at the freehub body itself for 30 to 45 seconds. Let it cool for 60 seconds. Try the removal tool again. Works in maybe 20% of cases, but it’s worth trying before you escalate to anything more dramatic.
The bench vise method. If your freehub body is removable, clamp it in a bench vise — protect the jaws with wood blocks. Position the vise so the cassette hangs downward. Insert the removal tool. The cassette’s own weight provides downward pressure while you turn the tool counter-clockwise with a wrench. The weight does half the work. Honestly underrated approach.
If the notches are already rounded. You can’t grip a rounded lockring notch with a standard tool. A pin punch and small hammer can sometimes tap a slightly rounded lockring loose — tap from the outside notch inward at an angle. Finicky work. If that fails, you’re looking at a specialized socket designed for damaged lockrings, or the lockring gets cut off. Neither option is fun.
When the freehub body is damaged. Stripped splines or severe corrosion on the body itself means the freehub cartridge may need replacing. A bike shop can assess this in five minutes. Replacement freehub bodies run $40 to $80 — the installation takes about 30 minutes.
Prevent It Seizing Again After Reinstall
You got the cassette off. Now let’s make sure this isn’t a recurring appointment.
Before sliding the cassette back onto the freehub splines, apply a thin coat of anti-seize compound or copper-based grease directly to the splines. Not a thick glob — just enough to coat them evenly. That thin layer is what stops corrosion from bonding the cassette to the aluminum freehub body over the next few years of riding.
Torque the lockring to spec. For Shimano, that’s 40 Newton-meters. SRAM is typically the same. Use a torque wrench — I’m apparently the kind of person who owns three of them and a Tektro torque wrench works for me while guessing by feel never does. Hand-tight isn’t enough. Gorilla-tight causes the exact problem you just spent an hour fixing. Two minutes with a torque wrench now versus this whole ordeal later. Easy choice.
That’s it, honestly. Anti-seize on installation, correct torque on the lockring, and you won’t be standing in the garage at 6 p.m. on a Sunday cursing at a stuck cassette ever again.


Stay in the loop
Get the latest bike maintenance pros updates delivered to your inbox.