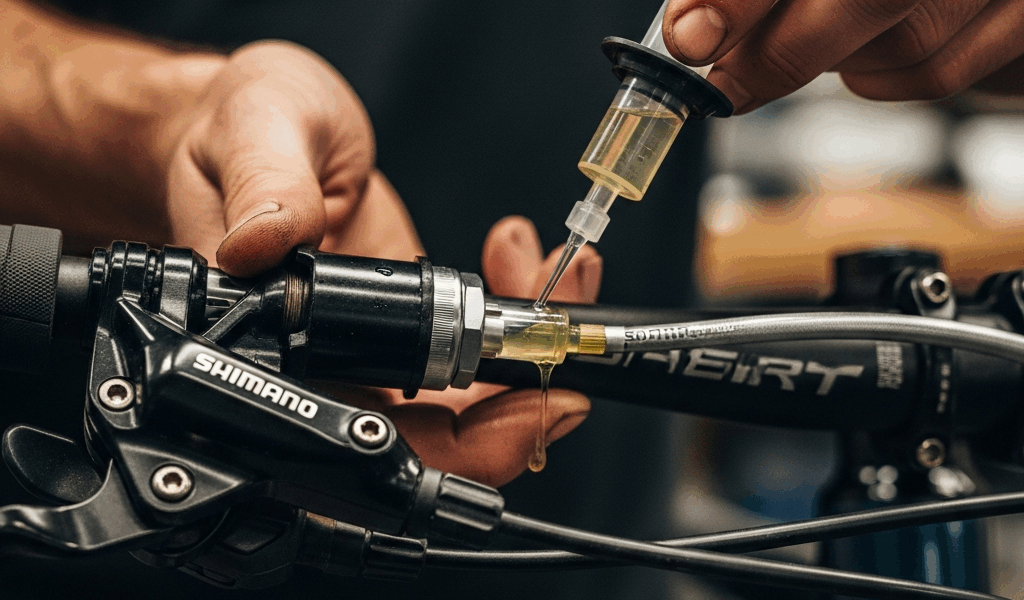
Hydraulic Bike Brake Bleeding — Step-by-Step for Shimano and SRAM
Hydraulic bike brake bleeding has become tricky with all the conflicting advice flying around. Half the guides online skip critical steps. The other half assume you already own every tool in the bleed kit and just need a reminder. As someone who’s been bleeding my own brakes for six years — starting on a Shimano XT hardtail setup, eventually adding a SRAM Code RSC when I picked up a full-suspension rig — I put in the hours studying what actually goes wrong and why. The two systems are genuinely different. Different fluids, different procedures, different enough that grabbing the wrong bleed kit means a wasted afternoon and a trip to the shop anyway. This guide covers both, start to finish, so you can handle it at home without paying shop labor rates — anywhere from $30 to $60 per brake depending on where you live.
This article includes affiliate links. We may earn a commission at no extra cost to you.
Signs Your Brakes Need Bleeding
This is the piece to know up front. A lot of home mechanics pull out the bleed kit at the first sign of trouble when the actual problem is something else entirely. Knowing the difference saves time and mineral oil.
The Spongy Lever
This is the classic symptom. You squeeze the lever and it has that soft, compressible feeling — like squeezing a stress ball instead of actuating a hydraulic piston. Air in the system is almost always the cause. Hydraulic fluid doesn’t compress. Air does. When air bubbles work their way into the brake line or caliper, your lever stroke goes into compressing that air before it ever moves the pistons. The brake still works. It just feels vague, and you’ve lost modulation — that precise middle ground between “barely slowing” and “locked up.”
Fresh from the factory, hydraulic brakes have a firm, progressive lever feel. If yours used to feel that way and now doesn’t, bleeding is probably the fix.
Lever Pulls to the Bar
Different problem, different cause. When the lever travels all the way to the handlebar before anything engages, you’re dealing with either a significant air pocket or pads worn down far enough that the pistons have extended too far from the rotor. Check pad thickness first — anything under 1mm of compound remaining means new pads, not a bleed. Shimano’s resin pads, like the B05S, run around $15 to $18 a pair. Replace them before you bleed. Bleeding with worn pads just recreates the same problem two rides later.
Inconsistent Stopping Power
One squeeze locks the wheel. The next squeeze at identical pressure barely slows you down. Unsettling on a descent — genuinely unsettling. Air bubbles migrate within the system, floating toward the lever when the bike sits one way, settling in the caliper when it’s oriented differently. Bleeding forces those bubbles out entirely and gives you predictable, repeatable power every single time.
When Bleeding Won’t Help
Contaminated pads and rotors produce poor braking that no bleed will fix. If your brakes squeal on every application and performance dropped suddenly — especially after a chain lube or spray wax session near the rotors — contamination is the likely culprit. New pads and a rotor wiped down with isopropyl alcohol are the solution there. Glazed pads — shiny, hard compound surface from prolonged light braking — can sometimes be revived with light sanding on 120-grit, but honestly, they’re usually done. A bleed does nothing for glazed or contaminated pads. Keep that in mind before you spend an hour on a procedure that won’t touch your actual problem.
Tools You Need Before You Start
This is where Shimano and SRAM owners immediately diverge, and the distinction matters more than almost anything else in this process.
Fluid — The Non-Negotiable Split
But what is the fluid difference, exactly? In essence, it’s this: Shimano uses mineral oil, SRAM uses DOT fluid. But it’s much more than that — these two fluids actively destroy each other’s seals. Mineral oil in a SRAM system swells and ruins the rubber seals inside the lever and caliper. DOT fluid in a Shimano system does the same thing. This isn’t a theoretical risk. It will ruin your brakes, and the damage isn’t reversible.
Shimano’s recommended fluid is their own Shimano Mineral Oil — 100ml bottles run around $8 to $12. You don’t need much for a standard bleed. Twenty to 30ml per brake is typically sufficient. SRAM recommends Maxima DOT 4 or their branded DOT fluid, around $10 to $15 a bottle. Buy more than you think you need the first time. Running out mid-bleed because you grabbed a half-empty bottle from two years ago is a real situation. Skip the misstep I made.
The Shimano Bleed Kit
Shimano’s TL-BT03 bleed kit runs about $20 to $25. It includes two syringes, a length of clear tubing, a funnel cup that threads onto the lever bleed port, and a small bottle of mineral oil. The funnel cup is lever-specific — different Shimano levers have different thread sizes and port configurations. Newer Shimano MTB levers (Deore, SLX, XT, XTR) use the TL-BT03-S small funnel. Older road and some gravel levers use a different adapter. Check your specific lever model before ordering anything.
You’ll also want:
- 2.5mm hex key (for caliper bleed port on most Shimano calipers)
- 8mm open-end wrench or 7mm — check your caliper’s bleed screw spec
- Isopropyl alcohol and clean rags
- Nitrile gloves — mineral oil is relatively benign but messy
- Blue painter’s tape to protect your frame
- A block of wood or a dedicated brake bleed block to insert between pads
The SRAM Bleed Kit
SRAM’s Standard Bleed Kit for MTB retails for around $30 to $40. It includes two syringes with barbed fittings, clear tubing, a Torx T10 driver for the lever bleed port, a 7mm wrench for the caliper fitting, and a small bottle of DOT fluid. The syringes have a locking mechanism at the connection point that Shimano syringes lack — that locking feature matters during the SRAM procedure specifically.
Additional items for SRAM:
- Torx T10 bit or driver (for lever bleed port screw)
- 7mm box wrench for caliper bleed port
- DOT-compatible nitrile or latex gloves — DOT fluid is an irritant and strips paint on contact
- Plenty of rags — DOT fluid removes paint from frames, carbon components, any surface it touches if left to sit
- Brake block for between the pads
- Isopropyl alcohol, 99% concentration preferred
A single drip of DOT 4 left sitting for ten minutes on a matte black frame — while you’re focused on the lever and not paying attention — will leave a permanent dull spot. I know this. Tape everything. Lay down rags. Treat it like you’re working with something corrosive, because to painted surfaces, you essentially are.
Shimano Hydraulic Brake Bleed Procedure
The Shimano process pushes fluid from the caliper up to the lever — bottom to top — which naturally carries air bubbles upward and out through the lever reservoir. It’s intuitive once you understand the direction of flow. That’s what makes this system endearing to us home mechanics: the physics actually work in your favor.
Setup and Lever Positioning
Set your bike in a work stand. Loosen the lever clamp enough to rotate the lever so it sits level — the lever blade should be horizontal, or as close to it as possible. The goal is to orient the internal reservoir so any trapped air rises toward the bleed port. This small setup step makes the whole procedure more effective, and skipping it makes the next 20 minutes harder than they need to be.
Remove the wheel. Insert your bleed block between the brake pads — this is critical. If you accidentally pull the lever without a block during the bleed, the pistons extend beyond their normal range and retracting them without damaging the seals becomes a whole separate problem.
Clean the area around the lever bleed port with isopropyl alcohol and a clean rag. Remove the reservoir cover screws — typically two small Phillips or JIS screws. Remove the cover and the rubber diaphragm underneath it. Fill the funnel cup about halfway with Shimano mineral oil and thread it onto the lever port. Keep it topped up throughout.
Connecting to the Caliper
Fill one syringe with approximately 20ml of mineral oil. Connect the syringe to the caliper bleed port using the appropriate fitting from your Shimano kit. The caliper bleed port screw is typically an 8mm fitting on older calipers, 7mm on more recent models — check yours before you start.
Open the caliper bleed port — just crack it, a quarter turn. The syringe is now connected to an open port.
Pushing Fluid and Removing Air
Slowly push fluid up through the caliper using the syringe. Gentle, steady pressure — not a fast shove. Watch the funnel cup at the lever. Bubbles will rise through the fluid in the funnel as air exits the system. Keep pushing slowly until no more bubbles appear and fresh, clear mineral oil flows through consistently. This takes anywhere from 30 seconds to several minutes depending on how much air is hiding in there.
While pushing fluid, flick the brake hose with your finger at several points along its length. Tap the caliper body. Physical vibration dislodges stubborn air bubbles clinging to the interior walls — small detail, genuinely makes a difference.
Once the bubbles stop, close the caliper bleed port. Snug is sufficient — don’t overtighten. Remove the syringe. Squeeze the lever five to ten times to work any remaining air toward the reservoir. The fluid level in the funnel may drop slightly as the system settles. Top it up with fresh mineral oil.
Finishing the Shimano Bleed
With the caliper port closed and fluid topped up, carefully remove the funnel without spilling oil into the lever cavity. The diaphragm goes back in first — make sure it’s seated flat with no folds or creases. Reinstall the reservoir cover and snug the screws down. Don’t overtighten them. They’re small, the threads strip easily, and replacement covers are annoying to source.
Wipe everything clean with isopropyl alcohol. Reinstall the wheel. Squeeze the lever — it should feel firm, responsive, and reach full engagement well before the bar. Still spongy? There’s likely a stubborn air pocket in the caliper that needs another pass. A second round almost always clears it.
SRAM Hydraulic Brake Bleed Procedure
The SRAM process is different from Shimano’s in both direction and technique. SRAM uses a two-syringe closed system where fluid moves between both ends simultaneously, and the procedure relies on a specific “bleeding edge” technique to purge air from the lever. Get this right and the improvement is dramatic — lever feel goes from uncertain to surgical.
Initial Setup
Rotate the SRAM lever so the bleed port on the lever body faces upward — the lever should be roughly perpendicular to the bar. This orientation positions the internal reservoir so air floats toward the bleed port. Remove the wheel and insert your bleed block between the pads.
Using a Torx T10, remove the lever bleed port screw. It’s small — set it somewhere you’ll actually find it again. Fill one syringe with approximately 10ml of DOT fluid and expel any air bubbles from the syringe itself by tapping it and pushing the plunger until a small stream of fluid exits. Connect this syringe to the lever bleed port. The SRAM syringes have a locking collar that threads onto the port — engage it fully.
Fill the second syringe with about 5ml of DOT fluid and connect it to the caliper bleed port using the 7mm fitting. Open the caliper bleed port a quarter turn. Both syringes are now connected to an open system.
The Two-Syringe Exchange
With the caliper syringe plunger pulled back slightly — creating a slight vacuum — slowly push fluid from the lever syringe down through the system toward the caliper. Watch for bubbles moving through the clear tubing. As you push from the lever side, pull gently on the caliper syringe. You’re creating fluid movement through the entire system in one direction.
Then reverse it. Push gently from the caliper side while pulling on the lever syringe. Work the fluid back and forth three to four times. Tap the hose, caliper, and lever body throughout — same reason as with Shimano. Air bubbles cling. Vibration dislodges them.
The Bleeding Edge Technique
Frustrated by persistent air in SRAM systems, experienced mechanics developed what’s commonly called the “bleeding edge” technique — and apparently it took years of botched bleeds before someone figured it out and documented it properly. With both syringes connected and the system open, pull the lever blade fully to the bar and hold it there. In this position, a small internal port inside the lever opens up and exposes a pocket where air commonly hides in SRAM lever assemblies. While holding the lever pulled, push a small amount of fluid from the caliper syringe. Release the lever slowly. Repeat this three to five times.
This step makes a significant difference. Without it, you can do a perfectly competent two-syringe bleed and still end up with a marginally spongy lever — that internal air pocket never got flushed. It’s the step most abbreviated guides leave out entirely, which is why so many people do a SRAM bleed and still aren’t satisfied with the result.
Closing the SRAM System
With both syringes still connected, close the caliper bleed port. Give the lever syringe plunger a very slight forward push to create minimal positive pressure in the system — this prevents air from being drawn back in as you disconnect. While maintaining that light pressure on the lever syringe, quickly remove it and reinstall the lever bleed port screw with the Torx T10.
Remove the caliper syringe. Wipe everything thoroughly with isopropyl alcohol. Reinstall the wheel. Squeeze the lever — firm, immediate engagement, no sponginess.
If there’s still any soft feeling, repeat the bleeding edge technique specifically. Nine times out of ten, that’s where the remaining air is sitting in a SRAM system.
Post-Bleed Check for Both Systems
After bleeding either system, spin the wheel and apply the brake progressively. Listen. Feel for anything unusual. The lever should be firm throughout its travel with clear engagement before it reaches the bar. Take the bike for a short test ride before trusting the brakes on a descent — even a quick lap around the block confirms the bleed worked before you commit to terrain where braking performance actually matters.
First, you should check all bleed port screws for tightness after that first ride — at least if you want to avoid finding a fluid leak on your second one. Thermal expansion from braking occasionally reveals a port that wasn’t quite snug enough. Five-second check. Worth doing every time.
Hydraulic brake bleeding at home pays for itself quickly. A single bleed kit from Shimano or SRAM costs less than one shop bleed service. After the first time, the kit is already paid for — every subsequent bleed is essentially free. More than the money, though, there’s something genuinely satisfying about squeezing a lever you just brought back from soft and vague to precise and powerful. Knowing exactly what changed and why. Having done it yourself, in your own garage, with your own hands.


Stay in the loop
Get the latest bike maintenance pros updates delivered to your inbox.