How to Bleed Shimano Hydraulic Brakes — The Complete Home Mechanic Guide
Shimano hydraulic brake maintenance has gotten complicated with all the conflicting advice flying around. As someone who got sick of dropping $60 to $80 per wheel at the local shop every few months, I learned everything there is to know about bleeding these systems myself. Today, I will share it all with you.
I bleed my Shimano hydraulics about once a month. Sometimes more — especially after long wet rides or a day spent hammering technical descents. The Park Tool video is genuinely excellent, but it runs 20 minutes and kind of assumes you already know what you’re doing. BikeRadar’s overview is fine, maybe 800 words, but it skips the stuff that actually matters when you’re standing in your garage at 2 p.m. on a Saturday with mineral oil on your hands and a low-grade panic about pad contamination.
This guide is for that exact moment. I’ve done this dozens of times, made most of the major mistakes, and I know which shortcuts blow up in your face and which ones genuinely save time.
Tools and Supplies Needed — Get This Right First
Probably should have opened with this section, honestly. Using the wrong fluid is the single most catastrophic error you can make during a Shimano brake bleed — and I nearly made it on my third attempt when I grabbed what I was convinced was my mineral oil bottle and started pouring. It wasn’t mineral oil. Don’t make my mistake.
Here’s what you actually need:
- Shimano mineral oil — 100% mineral oil, full stop. Shimano produces their own branded version; SRAM runs DOT fluid, while Magura and Formula also use mineral oil. I order the 50 mL bottles from BikeInn or Amazon for around $12 each. Small bottle, but a single bleed uses maybe 10 mL. Part number SM-DB90 is the standard one you want.
- Bleed kit — Shimano part number SM-BH90-SBM-A or SM-BH59-SBM covers you. Includes the bleed cups, hoses, and syringe. Budget $25 to $35. Do not cheap out here.
- 7 mm wrench — for the bleed ports on both lever and caliper. I use a standard combination wrench. Not adjustable — you want something solid.
- 1.5 mm Allen key — occasionally needed to adjust the reach screw on the lever before you start. Check your specific model first.
- Soft-faced mallet or plastic hammer — useful for tapping the caliper and hose to shake loose stubborn air bubbles.
- Paper towels and rags — mineral oil stains things. Keep a generous pile nearby.
- Small container or old tupperware — for catching overflow fluid.
- Isopropyl alcohol — 91% concentration or higher. You’ll use this to clean any oil off the rims, pads, or frame afterward. Mineral oil is forgiving compared to DOT, but you still want it gone.
I keep all of this packed into a small plastic toolbox on the shelf next to my workbench. Total investment runs $80 to $100 if you’re also buying a decent wrench set. That pays for itself after one or two shop-rate bleeds. Easy math.
Step-by-Step Bleed Procedure — The Actual Work
Step 1: Remove the Wheel and Position Everything
Take the wheel off first. Seriously. Bleeding with the wheel on is technically possible — it’s also stupid. I learned this the hard way when mineral oil dripped onto my tire and made proper pad seating impossible for the next 50 kilometers of riding. Lesson learned, painfully.
Once the wheel is out, position the bike so the lever and caliper sit on roughly the same horizontal plane. Gravity moves fluid through the system — that’s the whole mechanism here. I hang the rear of my frame on a hook in the garage, lever at chest height, caliper around waist level. For front brakes, I’ll either flip the bike upside-down in a work stand or lay it on its side on an old moving blanket.
Step 2: Prepare the Lever
Back out the reach screw on the lever body — usually a 1.5 mm Allen key fits it. A few turns is plenty. Don’t remove it completely, just crack it open. This expands the lever cavity and prevents air from getting trapped inside during the bleed.
Next, clip the small bleed cup onto the lever body. It collects fluid as you push the syringe from the caliper side. Make sure it seats firmly. A loose cup means fluid running down your handlebars, which is exactly as annoying as it sounds.
Step 3: Clean the Bleed Ports
The bleed port on the back of the lever is a small bolt — tiny, easy to overlook. Wipe it with a clean dry rag before you touch it with a wrench. Same goes for the caliper bleed port. Grit in the system is a bad day waiting to happen. I hit both with a dry rag first, then follow with a rag barely dampened with isopropyl alcohol if the ports look particularly crusty.
Step 4: Loosen the Caliper Bleed Port
With the 7 mm wrench, crack the caliper bleed port open about half a turn. Half a turn. Not all the way out — just enough for fluid to escape. Remove it completely and you risk dropping the bolt inside the caliper body. I’ve never done this personally, but I’ve heard the horror stories from people who have. It is not a fun afternoon.
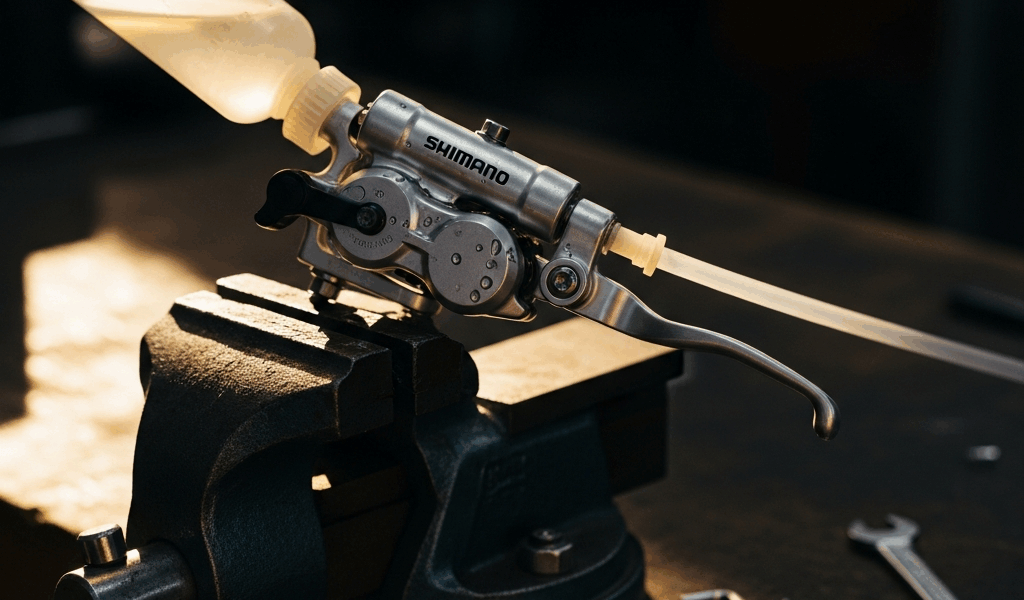
Step 5: Fill the Syringe and Connect
Draw mineral oil into the syringe. The Shimano kit includes pre-made hoses that thread onto the syringe at one end. Screw the hose onto the syringe, then thread the other end onto the caliper bleed port. Hand-tight first, then a quarter turn with the 7 mm wrench. Snug — not aggressive. Stripping a bleed port is one of those mistakes that turns a 20-minute job into a very expensive parts order.
Step 6: Push Fluid Up Through the Caliper
Frustrated by squishy brakes that always seemed to let me down on the steepest sections of trail, I developed a pretty specific rhythm for this step over about a year of practice. Push the syringe plunger slowly and watch for fluid moving up through the hose toward the lever. You’re looking for a steady stream of mineral oil — no air bubbles — coming out the lever bleed port.
This typically takes 10 to 15 deliberate, unhurried plunger pushes. Go slow. Rushing here is how you trap air bubbles that’ll haunt you for the next several rides.
Step 7: Loosen the Lever Bleed Port
While keeping light pressure on the syringe, use the wrench to crack the lever bleed port open. Fluid drips out into the bleed cup — along with air bubbles. That’s completely normal. Let them come. Some mechanics tap the hose and caliper body gently with the mallet at this point. I do this every time. It works. The tapping dislodges air pockets clinging to the interior walls of the hose that wouldn’t otherwise move on their own.
Step 8: Continue Pushing Until Clean
Keep slow, steady pressure on the syringe while the lever port sits open. Watch the fluid. When it runs completely clear with zero visible bubbles, you’re close — but not done yet. Push another five or six times after you think you’re seeing only clean fluid. The last pocket of air is always hiding somewhere. Always.
Step 9: Close Everything Up in the Right Order
This matters more than most guides let on — and I learned it the hard way. With the syringe still holding gentle pressure, tighten the lever bleed port first. Then tighten the caliper bleed port. Then remove the syringe and hose from the caliper. Do it out of order and air gets sucked back in. The sequence is non-negotiable.
Step 10: Test and Adjust
Reinstall the wheel. Pull the lever. It should feel firm and immediate — no sponginess, no travel before engagement. If it feels squishy, air is still in there. Probably needed another couple of pushes back in step 8. Don’t panic. You can always bleed again. That’s the whole point of doing this at home.
Tighten the reach screw back to where you had it. Spin the wheel. The brake should grab cleanly without any rubbing. If it’s rubbing, the caliper likely needs centering — but that’s a separate procedure for a separate afternoon.
Common Mistakes That Ruin the Bleed
Using DOT Fluid Instead of Mineral Oil
This is the nuclear option mistake. DOT fluid and mineral oil are chemically incompatible — introduce DOT into a Shimano mineral oil system and the seals swell, the internals fail, and you’re looking at a $200-plus repair bill minimum. I keep my DOT bottles and my mineral oil bottles in completely separate locations now. No chance of confusion, no ambiguity whatsoever.
Not Removing All Air Bubbles
Air compresses. Brake fluid doesn’t. When you grab the lever hard mid-descent, any air in the system compresses and the lever travels further before the pads actually engage — that’s the squishy, vague feeling everyone complains about. Squeezing harder is not the solution. Bleeding the system properly and getting every last bubble out is. Steps 6 through 8 are where this battle gets won or lost. Take your time there.
Over-Tightening the Bleed Ports
The bleed ports are aluminum. The bolts are usually steel. Aluminum loses that fight every single time. Go full gorilla mode with the wrench and you’ll strip the port — at which point your day gets significantly worse. Firm pressure is all you need. Enough that the port seals and doesn’t weep fluid. Snug. That’s the word. Just snug.
Contaminating the Pads with Oil
Get mineral oil on your brake pads and they’ll squeal like nothing you’ve ever heard — and more importantly, the pad material won’t grip the rotor the way it should. Wear nitrile gloves throughout the process. Cover your work surface with newspaper or an old shop towel. After the bleed, wipe down the rotor and pads with isopropyl alcohol on a clean rag. The alcohol evaporates completely and leaves zero residue behind.
Disconnecting the System Incorrectly
Worth repeating even though step 9 covers it — I’m apparently someone who needs to learn things twice, and doing this wrong twice is what finally made it stick for me. Loosen the caliper port before sealing the lever port and air gets pulled straight back into the system. Lever first, then caliper. Every single time.
Final Thoughts
Bleeding Shimano hydraulic brakes is not complicated. But what is a brake bleed, really? In essence, it’s removing air from a fluid-filled closed system and replacing it with fresh fluid. But it’s much more than that — it’s the difference between brakes that inspire confidence on steep terrain and brakes that make you nervous at exactly the wrong moment. That’s what makes reliable hydraulic brakes so endearing to us home mechanics who ride hard and maintain our own gear.
So, without further ado — keep your fluid fresh, use the correct kit, and don’t rush the air bubble stage. Your first bleed might take 45 minutes. By the fourth or fifth time, you’re probably done in 20. The brakes will reward you with modulation and stopping power that makes every descent feel exactly the way it should.


Stay in the loop
Get the latest bike maintenance pros updates delivered to your inbox.