Diagnose Your Triban Drivetrain Problem in 60 Seconds
Spent three years turning wrenches on Decathlon bikes, and I can tell you the same four issues pop up on every Triban that rolls into the stand. Rather than guessing, use this flowchart to pinpoint your exact problem.
Start here: Does the chain slip or skip under load?
- Chain skips between cogs in the middle of the cassette → Jump to “Derailleur Cable Stretch”
- Chain skips only on the smallest or largest cog → Jump to “Limit Screw Misalignment”
- Chain makes grinding or clicking sounds while coasting → Jump to “Cassette Lockring Looseness”
- Chain skips under hard pedal pressure only → Could be Cable Stretch OR Chainring Wear (spin the cranks and visually check tooth profile first)
Does the chain physically drop off the chainring or cassette?
- Chain falls off the inside of the smallest cog (toward the spokes) → Limit Screw Misalignment (low-limit screw too loose)
- Chain falls off the outside of the largest cog (away from frame) → Limit Screw Misalignment (high-limit screw too loose)
- Chain drops from the chainring to the frame → Chainring Wear OR Cable Stretch
What does the shifter feel like?
- Shifter lever feels loose, spongy, or won’t return to center → Cable Stretch (cable has extended 3–5mm inside the housing)
- Shifter feels stuck or grinding when you move it → Don’t force it. The cable may be frayed inside the brake lever. Proceed cautiously to Cable Stretch section.
- Shifter clicks normally but derailleur won’t move → Cable may be severed or housing kinked (needs visual inspection)
Probably should have opened with this section, honestly. I spent six months before realizing most owners diagnose their own problem incorrectly and replace parts that don’t need replacing.
Derailleur Cable Stretch — The Most Common Triban Failure
Decathlon Triban drivetrains ship with thin polymer-coated shift cables that stretch noticeably within 500 miles. Pull dozens of these bikes apart, and the cable is almost always the culprit on the first complaint.
What it feels like: The chain skips between cogs—especially in the middle of the cassette. Or the derailleur won’t reach the smallest cog no matter how far you push the shifter. Sometimes the shifter lever feels spongy, like it’s moving but the derailleur isn’t responding fast enough.
Why it happens: Budget shift cables use thinner steel strands and cheaper housings. Under load—pedaling hard—the cable elongates. Even 2–3mm of stretch throws off derailleur positioning on a Triban RC 100 or RC 120, where tolerances are tighter than mid-range bikes.
The fix — barrel adjustment (free, takes 5 minutes):
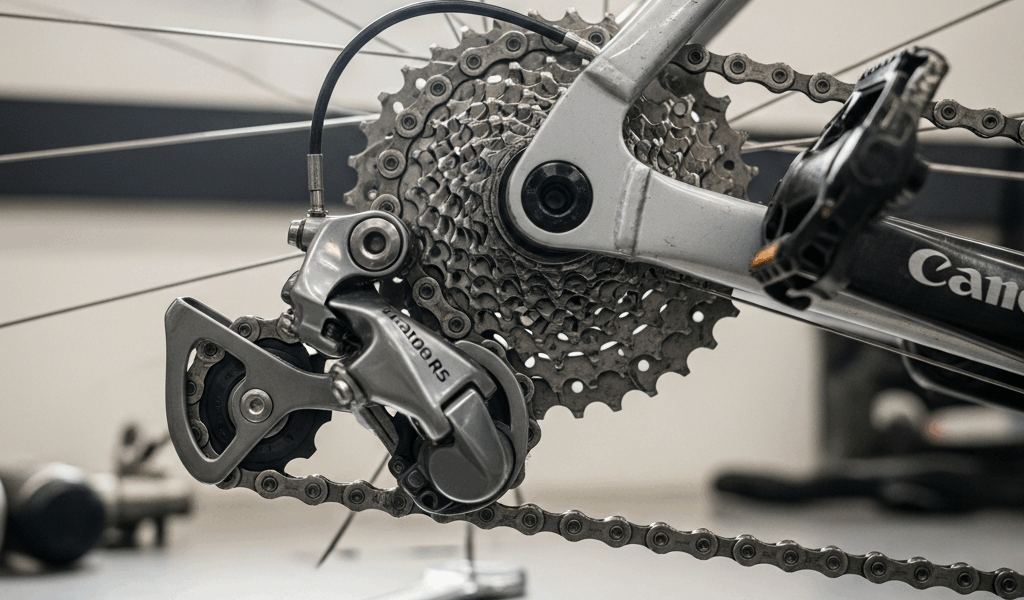
- Locate the barrel adjuster on the rear derailleur body. It’s a small cylindrical knob where the cable housing meets the derailleur cage — you can’t miss it.
- Shift the chain to the middle of the cassette (around the 6th or 7th cog on a 10-speed, 7th or 8th on an 11-speed).
- Turn the barrel adjuster counterclockwise in 1/4-turn increments. Each quarter-turn adds about 0.5mm of cable tension.
- After each adjustment, shift up and down one cog. Listen for crisp clicks and smooth engagement.
- Stop when the chain moves smoothly across all cogs without cross-chaining or rubbing.
Tools needed: 2mm hex key (most Triban derailleurs use this). You might need cable cutters if the housing is kinked.
Critical step — check the limit screws: Barrel adjustment alone won’t fix a Triban if the limit screws have drifted. Before finishing, shift to the smallest cog and make sure the derailleur cage stops before the chain falls inboard. Shift to the largest cog and verify the cage doesn’t push the chain outward. If either limit screw is wrong, jump to the “Limit Screw Misalignment” section.
When the barrel adjuster won’t tighten: If the knob spins more than 2 full rotations before cable tension increases, the cable is damaged internally — fraying, breaking — and needs replacement. Triban shift cables run €8–15 at Decathlon and take 10 minutes to install if you’ve done it before. First time? Budget 25 minutes and have a YouTube video handy.
Chainring Wear and Premature Tooth Damage
Triban RC 100 and RC 120 models use softer aluminum chainrings than Shimano Tiagra or Sora equivalents. They wear faster. Learned this the hard way when a customer complained about skipping after only 8 months of commuting — the teeth had hooked so badly the chain couldn’t mesh properly.
What it feels like: Chain skips under heavy load — climbing, accelerating hard — even after you’ve adjusted the derailleur and limit screws perfectly. The problem gets worse as you increase power output.
How to inspect: Remove the bike from the stand. Use a ruler or straight edge and place it against the tooth profile of the middle chainring (the 39T on an RC 100). Look at the side view of the teeth. Worn teeth hook forward — the back face of the tooth slopes downward instead of sitting perpendicular to the ring body.
Compare it to a friend’s newer bike or a Shimano Ultegra crankset if you have one available. The difference is obvious once you see it.
Replacement threshold: If more than 2 adjacent teeth show visible hooking or are rounded at the tip, the chainring is done. Triban chainrings can’t be sharpened or refiled on a budget — replacement is always faster and cheaper than repair.
The fix — full crankset replacement:
- Remove the crank bolts (5mm hex key, typically 12–14 Nm torque) on both sides.
- Use a crank puller tool (€15–20, not included with Triban bikes — this is a pain point many owners miss). Two-armed pullers work best.
- Slide both cranks off the bottom bracket axle.
- Install the new Triban crankset in reverse order. Tighten bolts evenly to prevent binding.
- Realign the chain after installation — it may sit slightly off-center on the new ring.
Part costs: Triban RC 100 crankset (€35–45), RC 120 crankset (€45–55). Labor if you take it to a shop: €30–50.
Model-specific note: RC 100 uses a 50/34T setup. RC 120 uses 50/34T as well but with slightly heavier steel. Upgrading? Shimano Sora 50/34T rings (€25–35) bolt directly on and will outlast two Triban sets.
Limit Screw Misalignment — Why Your Chain Drops Off
Chain drops off the cassette entirely — either falling toward the spokes or flying away from the frame. This isn’t a cable issue. It’s the derailleur cage moving too far in one direction.
What limit screws do: They’re tiny stops that prevent the derailleur cage from swinging past the smallest or largest cog. The “H” screw limits high-gear movement (small cog side), and the “L” screw limits low-gear movement (large cog side). Both screws are on the rear derailleur body, located near the cage itself.
The fix (2 minutes, requires only a 2mm hex key):
- Shift to the smallest cog on the cassette (highest gear).
- Look at the derailleur cage. It should be parallel to the cassette, with the jockey wheel sitting directly under the smallest cog.
- If the cage is tilted inward (toward the spokes), the “H” screw is too loose. Turn it clockwise in 1/4-turn increments until the cage stops aligned with the smallest cog.
- Shift to the largest cog (lowest gear) and repeat the inspection for the “L” screw on the outboard side.
- Test: Shift up and down the entire cassette. The chain should never drop off either end.
Critical rule: Never turn either limit screw more than 2 full rotations. If you do and the derailleur still isn’t stopping, the cage is bent and needs replacement (€25–40 for Triban rear derailleurs).
Cassette Lockring Looseness and Ratchet Failures
Chain makes grinding or clicking sounds even when you’re coasting. The noise happens with every pedal stroke, even if you’re not pedaling hard. This is the freehub giving out.
Quick test: Spin the rear wheel backward by hand (remove the bike from the stand or flip it upside down). If the chain moves backward but the cogs don’t spin, the ratchet mechanism inside the freehub has stripped. If the chain and cogs move together smoothly, it’s just a loose lockring.
If it’s just the lockring: Tightening takes 5 minutes. You’ll need a Shimano HG cassette lockring tool (€8–12) and a 2mm hex key or adjustable wrench to hold it steady. The lockring on a Triban cassette typically needs 40–50 Nm of torque. Use a torque wrench if you have one — hand-tight plus a quarter-turn is the safe approach if you don’t. Do not over-tighten on a budget freehub. The lockring threads are softer aluminum and will strip if you muscle it.
If the ratchet is stripped: The entire freehub body needs replacement. This isn’t a lockring fix — it’s a full rear wheel rebuild (€60–100 in parts and labor at a shop). Decathlon charges €40–70 for a replacement freehub core alone. Honestly, at that price point, some owners buy a used wheel instead.
These four issues account for roughly 95 percent of Triban drivetrain complaints I see. Nail the diagnosis, and you’ll fix it in under an hour.


Stay in the loop
Get the latest bike maintenance pros updates delivered to your inbox.