Where Bike Cables Actually Snap and Why
Bike cable failures have grown more complex with the conflicting advice flying around. As someone who’s been wrenching on bikes for twelve years, I’ve worked through the fundamentals of where these things break — because I see the same three spots fail every single week. Today, I’ll share it all with you.
But what is a cable failure point? In essence, it’s a specific location under chronic mechanical stress. But it’s much more than that — it’s usually a sign that something upstream went wrong with setup or maintenance.
The first spot lives inside your brake or shift lever. There’s a small nipple — mushroom-shaped, about 3mm across — that sits in a pocket at the base of the lever mechanism. Metal fatigue cracks it over time. You’ll notice a frayed or partially severed cable hanging from the lever body. Sneaky failure, this one. The cable looks completely fine for a few centimeters below the lever before you realize it’s totally gone at the head.
Second spot: where the cable enters the housing. A kinked ferrule — that tiny metal or plastic end cap — or a section of housing that took a hit during a crash or got pinched inside a bike bag will stress the cable at exactly that junction. Individual copper strands snap one by one until the whole thing lets go. Sharp kinks or visibly dented housing are your warning signs here.
Third is the anchor bolt. This is where the cable gets clamped to the derailleur or brake caliper. Over-tighten that bolt and the strands separate like old rope. The cable end looks like a tiny broom — strands splayed in every direction. That’s anchor bolt failure. Unmistakable once you’ve seen it once.
Here’s a quick diagnostic: pull gently on the cable. Free movement with the break at the lever means the nipple snapped. Bent or dented housing with a break right at that spot means housing failure. A frayed, tatty end at the clamp? Anchor bolt. Three failures, three distinct signatures.
Roadside Triage — Ride Home With a Snapped Cable
Worth mentioning before anything else. You’re not sitting in a workshop right now. You’re standing on the side of a road with a useless cable dangling from your lever, wondering how far you are from home.
Snapped rear brake cable? Manageable. Most modern bikes — your Shimano 105 setup, your Sora, whatever you’re running — have a barrel adjuster at the lever or caliper. Turn it fully counter-clockwise until it’s loose. Then reach down and manually pull the brake cable housing toward the frame with your hand. You’re creating tension by hand. Weird sensation, but it works. Don’t try this on any descent steeper than a gentle grade. Walk those hills. I’m apparently overly cautious about this and that approach works for me while improvised braking on steep grades never ends well.
Snapped front brake cable in traffic? Stop. Walk the bike. Spare yourself the wrong turn I took — I tried nursing a front brake failure through a half mile of city streets once. Nearly took out a car door. Front brake loss means almost zero stopping power on standard rim brake setups. Not worth the gamble.
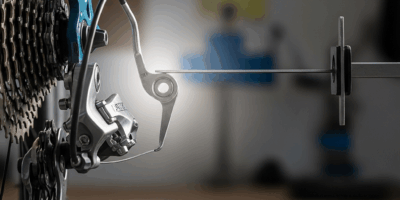
Snapped rear derailleur cable? You’re actually in decent shape here. Push the derailleur cage by hand until the chain sits on a middle cog — something around a 17t or 19t if you’ve got a standard 11-speed cassette. Use the limit screw marked “L” on the derailleur body as a mechanical stop to keep it from drifting further. One gear, ride home, fix it properly later. Inefficient, but functional.
Snapped front derailleur cable? Same principle. Push the cage manually into a middle ring position and use the barrel adjuster as a stop. One ring for the ride home.
The honest truth: nipple failures inside the lever and housing section breaks aren’t field-repairable. You’re limping home, full stop. If the snap happened at the anchor bolt and you’ve got a multitool with actual pliers, you might — emphasis on might — be able to re-clamp the frayed end and get a few miles out of it. Don’t count on it holding.
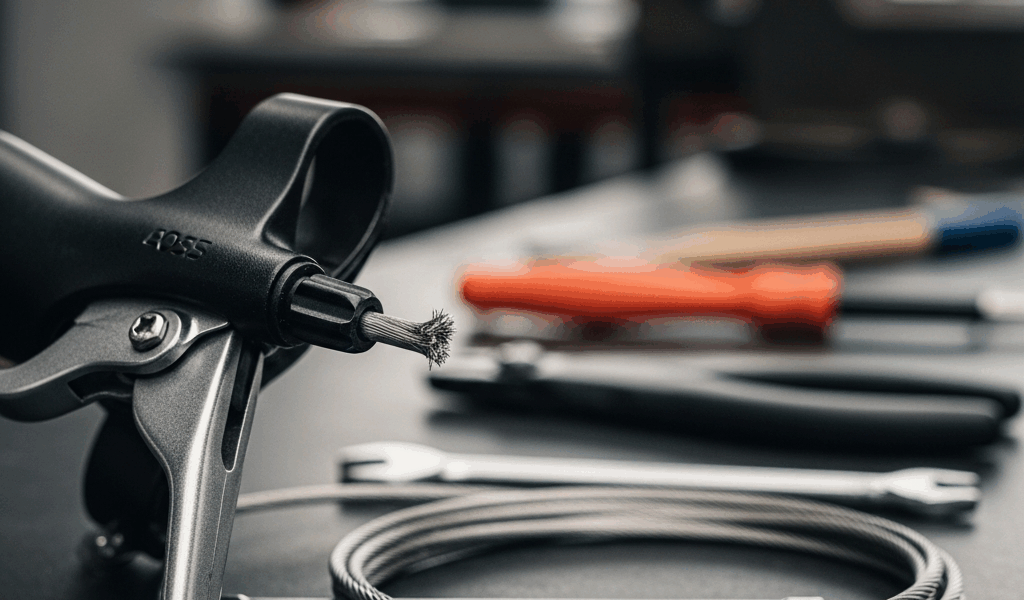
Tools and Replacement Cable You Actually Need
While you won’t need a full professional workshop setup, you will need a handful of specific items. Don’t substitute.
- Cable cutters — proper dedicated cable cutters, not sidecutters. Sidecutters crush the cable end and make threading a nightmare.
- 5mm Allen key for anchor bolts on most derailleurs and brake calipers.
- Needle-nose pliers.
- The correct replacement cable for your specific bike type.
First, you should verify which cable you actually need — at least if you want the repair to work. Brake cables are 1.6mm diameter. Shift cables are 1.2mm. They are not interchangeable. I’ve watched people order the wrong one three times in a single month. Specify when ordering online. Most replacement kits from brands like Jagwire or Shimano include ferrules and housing, but double-check the listing before you buy.
Shimano housing might be the best option, as cable replacement requires housing that won’t compress or fray under tension. That is because cheap housing stretches almost immediately, killing your shifting precision within weeks. About $15 per meter at any decent shop. Grab 2 meters — more than you think you need. That spare length saves you on awkward routing.
Step-by-Step Cable Replacement at the Bench
Frustrated by a snapped cable and a ruined Sunday ride, you now sit down with fresh parts and a clear head. Follow this order exactly.
- Start at the lever. Thread the new cable through the lever mechanism and seat that nipple firmly into its pocket. Wiggle it. Locked in place means locked — no movement whatsoever. Loose nipples slip. That was my first cable failure. 2011. Never again.
- Route the cable through the housing toward the derailleur or caliper. New housing sections get ferrules pressed into both ends. They should click. Audibly. If they don’t click, they’re not seated.
- Pull the cable taut by hand before touching the anchor bolt. Even tension across the whole run — that’s what you’re feeling for.
- Thread through the anchor bolt hole. Leave roughly 2-3cm of tail past the bolt for future adjustment.
- Clamp the anchor bolt firmly. Target somewhere around 40-50 inch-pounds if you have a torque wrench. If you’re guessing, think “firm handshake, not arm wrestling.” That’s the distinction.
- Grab the cable and yank it hard. Not to break it — to confirm it doesn’t slip at the anchor. Movement means re-clamp.
- Trim the cable tail with proper cutters. Keep that 2-3cm so the end doesn’t unravel.
- Test the full range of motion. Pull the lever or click through the shifter and watch for smooth, hesitation-free movement.
This new setup — done correctly — takes about 25 minutes and eventually evolves into the muscle memory that experienced home mechanics know and rely on today.
How to Stop It Snapping Again
That’s what makes preventive maintenance endearing to us home mechanics. Six months of attention beats an hour stranded roadside every time.
So, without further ado, let’s dive in.
Check the nipple inside your lever every six months. Pop the lever cover — most Shimano levers have a small rubber boot that peels back — and shine a light inside. Hairline cracks show up before the cable fully lets go. Replace immediately at that point. Don’t wait for the snap.
Lube the cable inside the housing. Most people spray something on the outside and call it maintenance. That does almost nothing. Use a syringe or a thin straw to push light oil — Finish Line Dry or a similar low-viscosity lubricant — down the actual housing length. Reduces internal friction significantly. Cable life extends noticeably.
Replace cables before you see visible fraying at the anchor bolt. A cable showing separated strands will snap within weeks. Sometimes days. That’s not a maybe.
Stainless steel cables last longer than plain steel in wet climates — period. I’m apparently a coastal rider and Shimano stainless works for me while standard steel cables never last a full season. Cost difference is maybe $3-4 per cable. Worthwhile. Plain steel under heavy use needs replacement every 18-24 months. Stainless stretches closer to three years.
Inspect, lube, replace before catastrophic failure. Do those three things consistently and a bike cable snapped mid-ride becomes something that happens to other people.


Stay in the loop
Get the latest bike maintenance pros updates delivered to your inbox.