“`html
Why Your Seatpost Gets Stuck in the First Place
Seatpost stuck situations have gotten complicated with all the half-truths flying around. As someone who’s spent the last eight years pulling seatposts out of frames—sometimes successfully on the first try, sometimes with a drill bit—I learned everything there is to know about what actually locks these things down. “Stuck” doesn’t always mean rusted, and that’s the first mistake most riders make when diagnosing the problem.
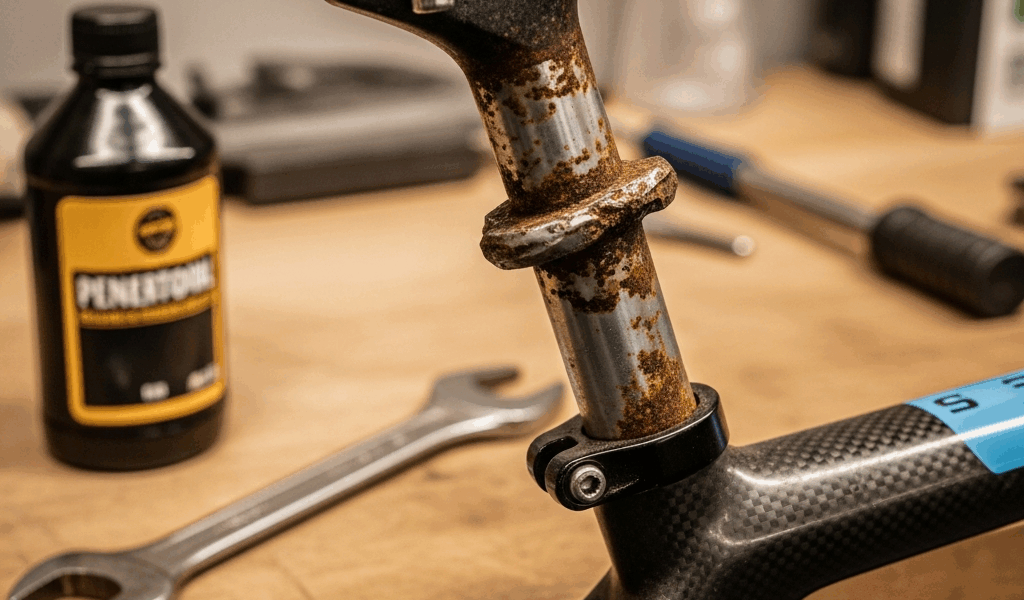
The real culprit is usually galvanic corrosion. You insert an aluminum seatpost into a carbon or steel frame, and you’ve basically created a battery. Water seeps in. Electrolytes form. Aluminum oxidizes faster than the frame material, and that corrosion layer bonds the two surfaces together with genuine chemical force — at least if water’s present long enough. It’s not friction. It’s not rust in the traditional sense. It’s metal literally welding itself to your frame.
Moisture traps dirt and grit inside the seat tube. That debris mixes with sweat, road salt, and whatever else works its way past your frame’s finish. The combination acts like grinding paste. Every time you shift your weight or adjust the saddle height, you’re abrading both surfaces microscopically. Eventually the micro-scratches are deep enough that the post locks in place. That’s what makes this mechanism so endearing to mechanics — it’s completely self-inflicted through normal riding.
Then there’s paint. If your frame’s seat tube was painted or clear-coated without primer, flakes of that finish get caught between the post and frame wall. Not much individually, but multiply that by the full circumference and you’ve got enough mechanical interference to make extraction genuinely difficult. I’ve extracted posts where the paint layer was the entire problem.
The friction-lock principle explains why even a brand-new aluminum post in a carbon frame can become unmovable within months. Manufacturers often make tolerances as tight as possible for aerodynamic rigidity — 27.2mm posts in 27.2mm bores with maybe 0.1mm clearance total. The tighter the tolerance, the more surface area in contact. More contact means exponentially more binding force when corrosion or debris enters the picture.
How to Tell If Your Seatpost Is Actually Seized or Just Tight
Before spraying lubricant everywhere, diagnose what you’re actually dealing with. Probably should have opened with this section, honestly.
Listen first. A creaking sound when you mount the bike and shift your weight typically means the post is moving slightly — it’s tight but not seized. A dead, silent, immobile feeling means it’s actually stuck. That difference matters for your approach.
Inspect the insertion point where the post enters the frame. Look for paint or finish chipping. Check whether the post has moved at all since you last noticed its position. Mark the post with a tape line at the frame opening. Wait a week. If the post hasn’t drifted down even a millimeter, it’s seized.
Apply moderate upward pressure — hand strength only — while twisting gently. A tight post will typically shift a quarter-inch with sustained pressure. A seized post won’t budge. Your arms might shake from effort, but the post itself stays locked in place.
Avoid the impulse to yank. Full-bodyweight pulling on a stuck seatpost in a carbon frame can crack the seat tube from the inside. I’ve seen it happen. One mechanic, one impatient moment, one $800 frame split lengthwise from the stress concentration. Not worth it.
Safe Removal Methods Starting With No Damage Risk
Start gentle. Penetrating oil first.
Spray a quality penetrating oil — Tri-Flow or PB Blaster work fine, around $6 per can — around the base of the seatpost where it enters the frame. Use the thin straw applicator to get the lubricant as deep as possible. Rotate the post slowly while spraying. Let it sit overnight. Twelve hours is the minimum. Twenty-four hours is better. The oil works by seeping into the gap between post and frame, breaking the chemical bonds created by galvanic corrosion.
Next morning, try gentle upward pressure combined with a slow twisting motion. Quarter-turn twists, not full rotations. The combination of oil penetration and mechanical agitation can free posts that seemed genuinely locked twenty-four hours earlier. Sometimes you’ll feel a sudden give.
If the post still won’t move, apply heat. But not to carbon frames directly. Use a hair dryer on high setting — I use a $12 basic one from any drugstore — directed at the frame material around the seat tube, not the post itself. Heat expands the frame slightly. The post expands differently because it’s a different material and thickness. This differential expansion can break the molecular bond. Spend five minutes with the hair dryer. Then try upward pressure again while the frame is still warm. I’m apparently someone who trusts this method while others never believe it works.
Rocking motion is next. With one hand gripping the saddle rails, apply upward pressure while gently rocking the post forward and backward in a five-degree arc. Don’t twist. Rock. The up-and-down component of the motion is what matters. Do this for thirty seconds, rest, repeat. Many posts that resist straight pulling yield to this technique because you’re introducing a tiny bit of vertical play that breaks the static friction lock.
Frame clamping leverage comes last before aggressive tools. Place the frame in a bike stand so the seat tube is vertical. Clamp the frame at the bottom bracket shell using a padded vise or frame clamp. This anchors the frame’s lower half so that when you pull the post, you’re not flexing the entire frame and distributing stress through the seat tube walls. Now pull upward with steady, moderate force — nothing sudden. Let physics do the work. The clamped frame can’t flex. All your pulling force goes directly into breaking the adhesion.
When You Have to Get Aggressive—What Works and What Breaks Frames
If none of those methods work after two days, you’re dealing with genuine chemical adhesion. Time to bring tools.
A seatpost extraction tool — Decathlon and Park Tool make them, $30-50 range — uses a wedge principle. The tool grips the post near the frame opening, spreads load across a wider surface area, and amplifies your pulling force without concentrating stress on the frame’s seat tube walls. This is where aluminum posts often come free. The wider contact area means lower pressure per square inch. Carbon frames especially need this distributed loading to survive extraction intact.
Vise clamps work similarly. Clamp the frame securely, then use a vise attached to the extraction tool gripping the post. Tighten the vise slowly while pulling. The mechanical advantage of a vise means you’re applying force in a controlled, spreadable way rather than yanking with your body weight.
What doesn’t work: hammering. Never tap the bottom of the seatpost with a hammer to drive it up. The impact transfers through the post directly into the frame. Carbon frames crack. Steel frames develop stress risers. Aluminum bends irreparably. I watched someone crack a $2,000 gravel bike frame doing exactly this — one hit with a rubber mallet, and the seat tube shattered internally.
If those methods fail and the post is genuinely welded in place, drilling becomes the only option. Last resort for a reason. Mark the diameter of your seatpost — let’s say it’s a 27.2mm post. Get a drill bit roughly 25mm in diameter. Clamp the frame. Drill slowly and steadily along the length of the seat tube, creating a split in the post. Don’t drill through the frame tube itself — just the post material inside. Once you’ve drilled maybe three inches down the post’s length, you can usually pry the post apart and extract it in pieces. The frame survives because you never drilled the tube walls, just the post material inside.
How to Prevent a Stuck Seatpost From Happening Again
Prevention is three-part: isolation, lubrication, and maintenance.
Isolation means stopping galvanic corrosion before it starts. Carbon-to-metal interface requires a barrier. Grease alone isn’t enough. Apply a thin layer of PTFE-based paste — Finish Line makes one for about 40 cents — to the lower three inches of the seatpost before insertion. This creates a chemical barrier between the aluminum post and whatever material your frame is made of. Don’t skip this step on carbon frames. The material cost is negligible. The frame replacement cost is eight hundred dollars.
Lubrication prevents friction-lock from forming. Use a waterproof grease rated for bicycle components — not general-purpose grease, which attracts dirt and accelerates corrosion. Work the grease into the seatpost bore of the frame using a brush or your finger. This fills micro-scratches and debris pockets, reducing surface contact area. The grease also displaces water, preventing moisture from establishing the chemical conditions for adhesion to develop.
Insertion depth matters too. Don’t cram the seatpost all the way to the bottom of the tube. Leave roughly one inch of clearance from the frame’s bottom bracket area. This reduces the total contact area and gives you more seatpost length to grip if extraction ever becomes necessary. Most frames have a line marking the minimum insertion depth. Respect it. Don’t make my mistake of ignoring that marking on a 2015 bike.
Maintenance interval: six months. Most riders skip this completely. Pull the seatpost every six months — even just an inch — then push it back down. This motion breaks any initial corrosion bonding before it becomes serious. Takes two minutes. Prevents weeks of extraction headaches later. That’s a genuine time calculation.
If your climate is wet or you ride near salt water, do it quarterly. Coastal California, Pacific Northwest, anything near the ocean — quarterly is not paranoid, it’s necessary. I’ve seen seized posts develop within four months in riders who ignored this.
The seatpost that won’t budge usually costs nothing to prevent and everything to fix. Prevention is the move.
“`

Stay in the loop
Get the latest bike maintenance pros updates delivered to your inbox.