“`html
Why Your Bike’s Front Derailleur Won’t Shift Up — And How to Fix It
A front derailleur that refuses to shift up to larger chainrings is one of the most frustrating mechanical failures you can encounter mid-ride. I spent three seasons as a volunteer mechanic at a community bike shop, and I’d estimate that 70% of the front derailleur complaints we fielded were specifically about upshifting failure. The bike shifts down fine. It just won’t move up. That specificity matters because the causes are completely different from downshift problems.
The good news: this isn’t a cable replacement situation in most cases. It’s almost always one of three things — cable tension, limit screw position, or cage alignment. Probably should have opened with this section, honestly, because it’ll save you from replacing parts you don’t need to replace.
Why Front Derailleurs Fail to Shift Up
A front derailleur moves the chain by pushing it sideways across the chainrings. To shift UP, the cage pushes the chain toward the larger ring. This requires force. If that force doesn’t exist, or gets blocked partway through, you get nothing.
Here’s where most DIYers go wrong: they assume “it won’t shift” means “the cable is broken.” Then they replace the cable. It still won’t shift. The cable was fine all along.
The three actual failure points:
- Insufficient cable tension — The derailleur pulls the cage inward (toward the frame) using cable tension. If that tension is too low, the spring inside the derailleur overpowers it, and the cage snaps back before the chain fully engages the larger ring.
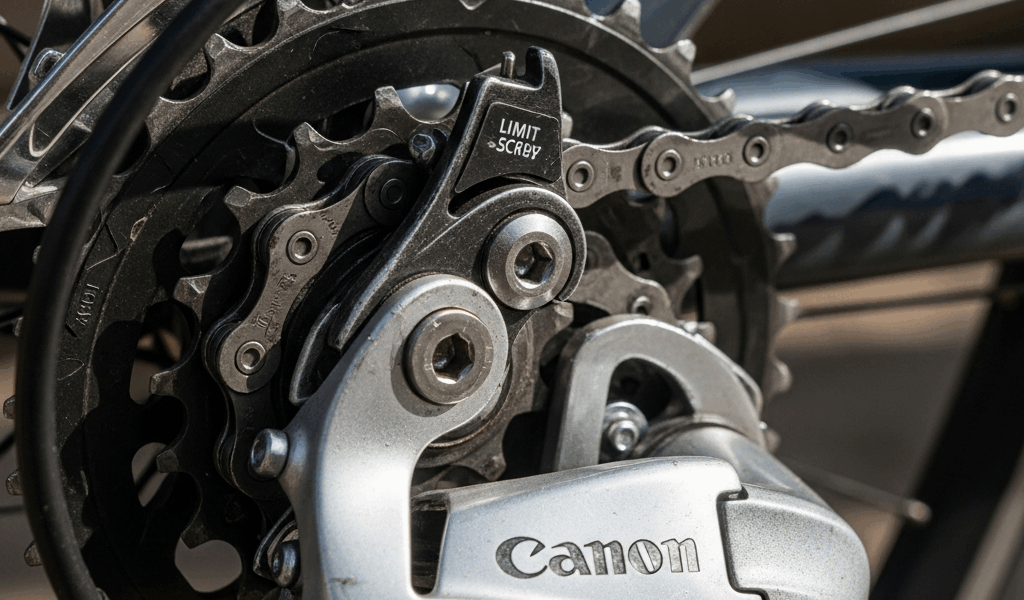
- High limit screw set too tight — This screw physically prevents the cage from moving outward past a certain point. Set it one-eighth of a turn too tight, and the cage can’t reach the large chainring at all.
- Cage bent or misaligned — This typically happens after a crash or if the derailleur was installed at an angle. A bent cage won’t follow the chainring profile properly, so the chain skips across instead of shifting.
We’ll diagnose these in order, because cable tension is the fastest thing to check, and if that’s not your problem, the limit screw is next.
Check Cable Tension First
The barrel adjuster is your primary tool here. It’s the knurled knob where the cable housing enters the derailleur body itself — not the shifter. On most bikes, it’s on the derailleur’s upper body, pointing slightly downward or to the side. Locate it. You’re looking for a small brass or aluminum cylinder with circular grooves.
Here’s the mechanical principle: turning the barrel adjuster counterclockwise (away from the bike frame) pulls more cable through, which increases tension. Clockwise decreases tension. This is where the human brain and the bike’s physics sometimes disagree, so don’t feel bad if you have to test this twice.
The click-test method: Shift the front derailleur to its lowest position (small chainring). Now grab the shifter lever — don’t push it, just hold it loosely at the point where it engages the shift mechanism. You’re feeling for resistance. Now try to move the derailleur cage outward (toward the large ring) using your finger. There should be slight resistance, like you’re fighting a light spring. If the cage moves freely with zero tension, your cable is too loose.
Start adjusting. Turn the barrel adjuster counterclockwise one full click. That’s roughly one-quarter turn. Repeat the touch-test. You should feel slightly more resistance. Shift to the large chainring with your shifter. Did it move? Completely, or partway?
Completely but slowly: cable friction issue, not tension. We’ll address that separately.
Partway and stops: add another quarter-turn of tension. Test again.
Chain won’t reach the large ring no matter what: you’re either past the cable tension solution, or the high limit screw is blocking it. Move to the next section.
I made this exact mistake on my 2015 Trek hybrid — I added barrel adjuster tension like I was winding a clock, five full turns of aggressive tightening. The cable housing started to kink. The derailleur cage actually bent inward slightly from the pressure. Add tension in quarter-turn increments. Patience is free.
Your sweet spot: the derailleur snaps up to the large chainring cleanly within one second of engaging the shifter, then stays there without slowly creeping back down. That’s correct cable tension.
Adjust the High Limit Screw
If cable tension isn’t your answer, meet the H screw. That’s the “high” limit screw — it controls the maximum outward travel of the derailleur cage. Every front derailleur has one, usually marked with a tiny “H” stamped into the derailleur body or labeled on the housing near the adjustment point.
Here’s what the H screw does: it’s a mechanical stop. The cage has a tab, and the H screw’s tip presses against that tab. As you turn the screw clockwise (inward), it stops the cage from moving outward. Counterclockwise (outward) allows more travel.
The critical rule: one quarter-turn at a time. That’s one-quarter of a full rotation. Most front derailleurs are absurdly sensitive to this adjustment. A half-turn can mean the difference between “shifts perfectly” and “doesn’t engage the large ring.”
Locate the H screw. You’ll need a small Phillips or flathead screwdriver — probably a 2mm or 3mm depending on the derailleur model. Shimano tends toward Phillips. SRAM uses different heads depending on the generation.
The test procedure:
- Shift the front derailleur to the lowest position (small chainring) by hand or shifter.
- Using your shifter, attempt to move to the large chainring.
- If the cage moves outward but stops short of the large ring, the H screw is too tight. Loosen it one-quarter turn counterclockwise.
- Test the shift again.
- Repeat until the cage reaches the large ring cleanly.
Too tight and it won’t shift up. Too loose and the chain drops off the top of the large ring, sometimes into the frame. You want the sweet spot where the cage pushes the chain all the way onto the large ring without overshooting.
If you’ve adjusted the H screw a full half-turn in either direction and the shift still isn’t working, you’ve likely got a cage bend or cable tension issue. Go back and double-check the barrel adjuster — you might have missed something.
Inspect Cage Alignment and Bend
This is the field diagnosis that requires zero tools. Sometimes it’s the answer. Sometimes it’s not, but you need to rule it out.
A front derailleur cage should be parallel to the plane of the chainrings. Imagine looking at the bike from the left side (drivetrain side). The cage’s inner and outer walls should follow the curve of the chainrings without leaning in or out.
The no-tool visual test: Dismount the bike. Look directly at the derailleur from the side, at eye level. The cage should appear as a straight line from top to bottom, sitting just millimeters away from the outer edge of the large chainring. If the cage appears tilted — leaning inward or outward — or if the gap between cage and chainring is uneven (tight at the top, loose at the bottom, or vice versa), you’ve got a bend.
A minor bend (1-2mm of deviation) might still shift if the cable tension and limit screws are perfect. But the shift will be reluctant, slow, or intermittent.
A major bend (more than 3-4mm, visible tilting) means replacement. You can’t straighten a derailleur cage with a hammer or adjustable wrench without cracking the alloy. I tried once with a Shimano Sora derailleur in 2018. Cracked it. Bought a new one for $45.
When does a cage bend happen? Crashes. Falls where the bike lands on the drivetrain side. Impacts during transport if the bike’s packed in a car without a case. Sometimes shipping damage if the bike came assembled in a box.
If you can’t identify a visible bend, but the upshift still isn’t working after you’ve checked cable tension and the H screw, the bend is minor. Move on. It’s not your primary problem.
Quick Test Before Calling It Done
You’ve adjusted cable tension, verified the H screw position, and ruled out cage damage. Now test under real riding conditions.
Shift through all three chainrings (assuming a triple crankset, or both chainrings on a double) while riding slowly on flat ground with minimal pedal pressure. The derailleur should click cleanly into place on each ring. Each shift should complete within one second.
Now stand and pedal harder, normal cadence and power. Repeat the shift sequence. A front derailleur that works under light load but hesitates under power usually has cable friction — the housing is kinked or the cable is dirty. That’s a different repair (rerouting the cable or replacing it).
If it shifts cleanly at all loads, you’re done.
If it shifts slowly or the chain makes noise while transitioning between rings, your cable tension might be slightly off still. Add another quarter-turn of barrel adjuster tension and retest. This is normal fine-tuning.
If it doesn’t shift at all even now, and you’ve confirmed the cable is intact and the derailleur is mechanically sound, you might have a shifter issue — the shift lever isn’t actually pulling cable. That’s beyond this repair. Take the bike to a shop.
You’re looking for one specific outcome: silent, quick upshifts that hold their position. Once you’ve got that, you’ve solved the problem.
“`


Stay in the loop
Get the latest bike maintenance pros updates delivered to your inbox.