Why Your Disc Brake Suddenly Rubs After Removing the Wheel
Disc brake rubbing after wheel removal has gotten messy with all the conflicting advice flying around. Forums say caliper alignment. Your buddy says bleed the system. Some YouTube comment says replace the rotor entirely. I’ve been riding and wrenching for fifteen years — mountain bikes, gravel rigs, commuters, all of it — and I picked up the practical knowledge of this specific, maddening problem. Today, I will share it all with you.
Here’s the short version: you pull the wheel off for a flat or to stuff the bike into a travel case, pop it back in, and suddenly there’s this grinding whisper — like a playing card in spokes, except it’s your rotor kissing the pads. Nothing broke. Nothing’s visibly wrong. Nine times out of ten, it’s one of two things: the wheel didn’t fully seat back into the dropouts, or the pistons crept inward while the rotor was gone. Both are fixed in under ten minutes. No bleed kit. No new parts.
Step 1 — Check the Axle Seating Before Touching the Caliper
Start here. Always. I’ve personally watched riders spend forty-five minutes fiddling with caliper bolts when the actual problem was a thru-axle that looked closed but wasn’t fully threaded home.
Worth flagging before going further — because 70% of post-removal rubs disappear right here without touching anything else.
Running a thru-axle? Grab the hex key and hit the torque spec. Most modern thru-axles want 12–15 Nm. That’s firm, not gorilla-tight. A Fox 15mm thru-axle wants 15 Nm specifically. DT Swiss usually sits at 12 Nm. The spec is stamped right on the axle shaft — check it before assuming. Thread it in deliberately, not quickly. Feel for the wheel seating square into the dropout. There’s a subtle mechanical shift when the cone seats fully — you’ll sense it if you’re paying attention.
Quick-release setup? Position the lever on the opposite side of the wheel from the brake caliper. It should close with real resistance — not a gentle swing, not requiring a mallet. If the lever flops shut without effort, the skewer isn’t clamped. Open it back up, thread the opposing nut one full rotation clockwise, then close the lever again. It should take genuine palm pressure to get it fully shut.
Spin the wheel. Listen. If the rub is gone — great, you’re done. Walk away. Don’t touch anything else.
Still rubbing? Move to the caliper.
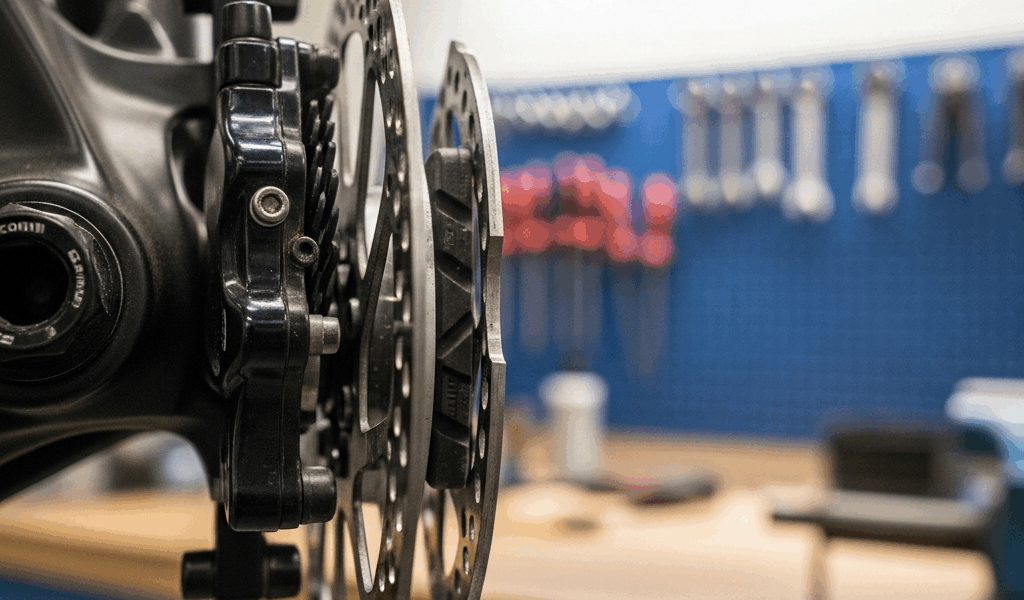
Step 2 — Loosen and Recenter the Caliper Over the Rotor
But what happens to the caliper when the wheel leaves the frame? In essence, it loses its reference point. But it’s much more than just a positional thing — the hydraulic pistons stay tensioned, and with no rotor pushing back, they migrate inward by fractions of a millimeter. When you reinstall the wheel, the rotor slots into an off-center position relative to those crept pistons. Hence: rub.
That’s what makes the brake float method endearing to us home mechanics. No special tools. A 4mm or 5mm hex key — depending on whether you’re running Shimano, SRAM, or TRP — and about two minutes. So, without further ado, let’s dive in.
Loosen both caliper mounting bolts exactly one full turn each. Not removed — just loose. The caliper will now pivot freely around the rotor.
Spin the wheel gently. Then squeeze the brake lever and hold it — five full seconds. That lever pressure pushes the pistons outward, and those pistons walk the caliper into true alignment with the rotor. Keep the lever squeezed the entire time.
While still holding the lever down, snug both mounting bolts back up. Firm, not crushing. Release the lever. Spin the wheel.
Silence, usually. The pistons found their natural position under load, and the caliper followed. If there’s still rubbing, watch the rotor as it coasts through — look for consistent gap on both sides. One side tighter than the other means either a bent caliper body or a mounting surface that’s out of plane. That’s a shop conversation, not a driveway fix.
One small trick worth knowing: slide a business card between the rotor and the outer pad while the caliper bolts are still loose. It acts as a standoff shim — keeps the gap honest while you tighten. Pull it out, spin the wheel. Saves ten minutes of debate.
Flat-mount calipers — the ones bolted directly to the frame boss rather than a post — have less lateral adjustment range than post-mount systems. If yours is flat-mount and the rub persists after floating, the rotor itself might have a slight bend. Which brings us to Step 3.
Step 3 — Check for a Bent Rotor if Rub Is Intermittent
There’s a meaningful difference between constant rub and intermittent rub. Constant rub means caliper alignment or axle seating — something static is off. Intermittent rub, the kind that pulses rhythmically once per wheel revolution, means the rotor has a wobble. One small high spot making contact on every pass.
Finding it is straightforward. Grab a Sharpie — a black Sharpie, not a dry-erase marker, those smear immediately. Spin the wheel slowly with the brake released. When the rotor passes through the caliper slot, mark the spot where you hear contact or see the rotor deflect. Spin again. That mark should reappear at the exact same rotational position every time. That’s your bend.
You can true a slightly bent rotor at home — at least if you own a rotor truing fork. Park Tool makes a solid one, the RTF-1, runs around $35–$40. Clamp it over the rotor on either side of the bend, position the high spot in the fork’s channel, and apply slow, even pressure. Check with the Sharpie again. Small corrections only — these rotors don’t take much.
Skip the misstep I made. I once tried correcting a bent rotor using thumb pressure against the spinning edge. Contaminated the pad immediately — skin oils are invisible but deadly to brake friction. The pads were useless within two stops and took a full isopropyl wipe-down to partially recover. Just buy the truing fork. Thirty-five bucks.
When the Rub Comes Back Every Time You Remove the Wheel
Frustrated by a rub that returns the instant the wheel is reinstalled, one of my riding partners eventually discovered his dropout faces were machined slightly out of parallel — a manufacturing tolerance issue on a mid-range aluminum frame. He’d been realigning the caliper after every single ride. That was 2019, and it took him four months to figure out what was actually wrong.
If you’ve seated the axle, floated the caliper, and checked rotor wobble — and the rub still reappears reliably after every reinstall — something structural is wrong. Dropout faces out of alignment, frame damage, or worn dropout surfaces can cause the wheel to seat off-center every single time regardless of what you adjust downstream.
This is when you book a shop visit and specifically mention “dropout facing.” Shops with a facing tool — a Shimano TL-FC36 or equivalent — can machine the surfaces flat and parallel in about an hour. Expect $50–$80 depending on the shop. Not a home repair. Worth every dollar if the alternative is realigning your caliper after every flat change.
One final thing worth checking: if the brake was fine before wheel removal and you now see pads that look unusually compressed — or you accidentally squeezed the lever with the wheel out — those pads may have absorbed contamination from the pistons extending fully. I’m apparently sensitive to this issue and Shimano XT pads work for me while SRAM pads never fully recover once contaminated. Fresh pads and a rotor wipe with 91% isopropyl alcohol will confirm whether that’s the culprit.
The sequence every time, in order: axle seated first, caliper centered second, rotor straightness third. Five minutes. Prevents an afternoon of second-guessing.


Stay in the loop
Get the latest bike maintenance pros updates delivered to your inbox.