Why a Tire Bead Refuses to Seat
Tire bead seating has shifted noticeably with all the tubeless misinformation flying around. So let me cut through it. A bike tire refuses to seat for one of three reasons — and knowing which one you’re actually fighting saves hours of genuine frustration. The bead (that wire-reinforced edge gripping the rim) is either slightly too tight for your specific rim’s inner width, you’re not pushing enough air volume fast enough to shove the bead outward, or your rim tape has lifted and broken the seal. That third one gets people constantly.
I spent an entire evening last month convinced I had a defective tire. Turns out my rim tape had bubbled right under the valve hole. Humbling doesn’t quite cover it. Save yourself the trouble I had.
The good news: most of the time this is fixable without returning anything. You just need the right sequence, the right tools, and honest expectations about compatibility.
Tools and Supplies You Need Before You Start
While you won’t need a full workshop compressor setup, you will need a handful of specific tools. Quick note before the rest of this.
- Track pump or air compressor. A standard floor pump won’t cut it for tubeless — you need sustained high volume or a single hard blast. Workshop mechanics use compressors. Serious home mechanics invest in something like the Lezyne Steel Floor Drive or a Viair 12V compressor. Budget somewhere between $80 and $200 depending on which direction you go.
- Soapy water in a spray bottle. Mix dish soap and water at roughly a 1:4 ratio. Spray the full bead circumference — both sides, generously. This isn’t optional. It reduces friction enough that the bead can actually slide into the rim channel instead of fighting you.
- Tire levers. Two flat plastic ones. Not metal. Metal scores aluminum rims and will crack carbon fiber outright. That’s an expensive afternoon.
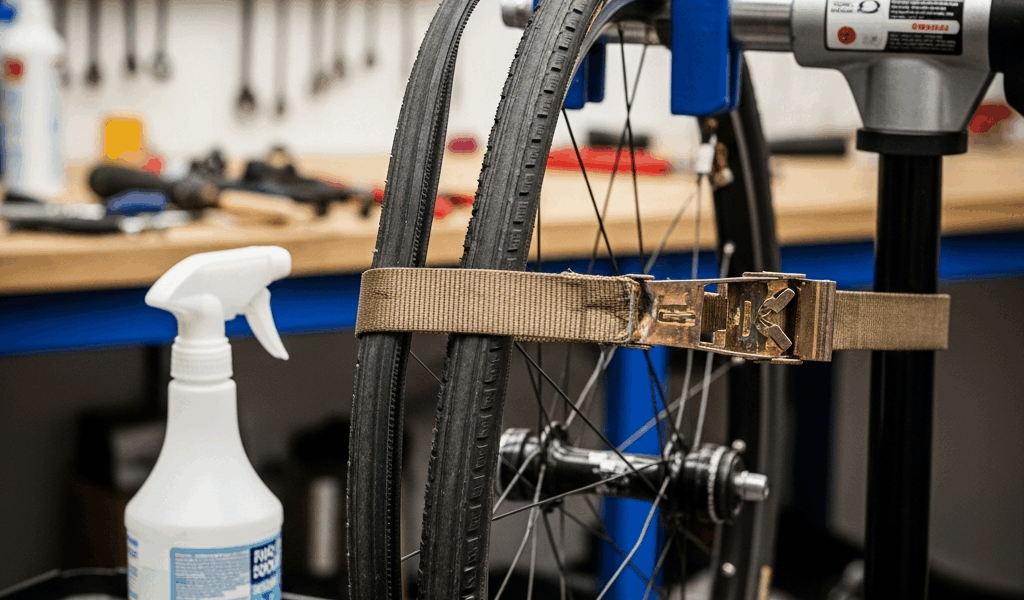
- Ratchet strap or cargo strap — optional, but honestly worth keeping in your kit. A 1.5-inch ratchet strap wrapped around the tire’s equator concentrates pressure inward instead of letting the tire push sideways off the rim. More on this later.
Step-by-Step Fix for Clincher Tires
Here’s the exact sequence I use on the workbench. Works eight times out of ten. So, without further ado, let’s dive in.
- Remove the wheel and check the tube. Unseat the tire completely using your levers. Look inside — confirm the inner tube isn’t bunched or folded under the bead. A twisted tube physically prevents the bead from sitting flat. Smooth it out with your hand before you do anything else.
- Spray soapy water along the entire bead circumference. Both sides. Top and bottom. Coat it generously. This step is non-negotiable on any tight-fitting tire, and skipping it is why most people spend twice as long on this job as they need to.
- Reseat the tire by hand, working the bead into the center channel. Start at the valve stem and move both directions around the rim simultaneously. Use your palms to roll the bead downward into the deepest part of the center groove. This takes maybe two minutes and saves twenty minutes of inflation fighting. Your hands will hurt slightly. That’s normal.
- Inflate slowly while watching the bead climb the rim walls. Start around 20 psi. Watch both sides. The bead should rise evenly. If one section lags behind, stop — deflate fully, work that spot by hand again, and restart. Forcing pressure past an uneven bead creates a bulge that won’t go away.
- Continue to full pressure. Once the bead has cleared the rim’s edge all the way around, keep pumping to your target — typically 60–100 psi for road, 30–50 for mountain. You’ll usually hear a sharp pop, sometimes a series of them. That’s the bead snapping into the seat. That’s exactly what you want.
- If the bead still won’t pop around 80 psi, deploy the ratchet strap hack. Wrap the strap snugly around the tire’s equator — firm enough to feel resistance, not tight enough to deform the casing. This pulls the sidewalls inward, reduces the effective diameter, and gives the bead just enough slack to move. Inflate to 40 psi, wait 30 seconds, then crank hard. The bead usually gives suddenly.
That ratchet strap trick solves roughly 90% of stubborn clincher problems, for what it’s worth.
Step-by-Step Fix for Tubeless Tires
But what is tubeless failure, really? In essence, it’s a sealing problem as much as a seating problem. But it’s much more than that — the bead has to seat AND create an airtight bond with the rim tape at the same time. Most failures happen at the tape. Not the tire.
- Inspect the rim tape for bubbles, lifted edges, or dry rot. Run a finger along the full circumference — both sidewalls and across the rim bed. Any bubble or wrinkle is an air leak, and the bead simply won’t seat properly over it. If the tape is damaged, pull it off (a heat gun makes this significantly easier) and apply fresh tape. Schwalbe and Stans No Tubes are the industry standards here. Expect to spend $15–$25 per roll.
- Remove the valve core to maximize airflow. A valve core tool costs about $3 at any shop, or comes in most tubeless kits. Pulling the core lets air dump straight into the tire cavity without restriction — and that volume difference is enormous on tubeless setups. Don’t skip this.
- Apply soapy water even more liberally than you did with the clincher. Tubeless beads run tighter tolerances. Saturate the bead completely. More than you think you need.
- Use a compressor or dedicated tubeless inflator — not a hand pump. A hand pump cannot generate enough volume fast enough. Full stop. You need either a shop compressor or a dedicated tubeless inflator. The Lezyne Alloy Floor Drive Digital runs around $130. The Bontrager Flash Charger sits closer to $150. Connect, remove the hose cap, and blast air into the tire. You’re looking for sustained pressure above 100 psi held for three to five seconds. The bead will pop suddenly — sometimes loudly.
- Reinstall the valve core immediately and top off pressure. Once you can see the bead locked into the seat visually, thread the valve core back in and pump to your target pressure. Let the tire sit overnight. If it drops more than 5 psi, the seal is incomplete — usually a tape issue, or the bead didn’t fully seat on one section.
- If the bead still refuses after two compressor attempts, go back to the rim bed. Tape bubbles hide under sidewalls and won’t show up until you’re under pressure. Pull the tire off completely and look hard at every centimeter of tape. This is almost always the culprit at this stage.
- CO2 canisters work as a trail fix only. A Lezyne or Bontrager CO2 inflator can seat a tubeless bead in an emergency out on the trail — it’s cold, it works once, and it’s done. I’m apparently bad at resisting shortcuts, and CO2 in the workshop never ends well for me while actually taking the five minutes to grab the compressor always does. Don’t make it a habit.
When the Tire and Rim Are Simply Incompatible
Sometimes the problem isn’t technique. It’s a mismatch. Certain tire-and-rim combinations are difficult at best and genuinely unsafe at worst — I learned this firsthand after spending 45 minutes trying to seat a Schwalbe Pro One on a Chinese carbon rim with a 19.5 mm internal width. The tire spec called for 19–21 mm. It eventually seated but felt loose under pressure, and I wasn’t willing to ride it. That’s what makes compatibility knowledge endearing to us mechanics — it turns a frustrating guessing game into a straightforward checklist.
Signs of a mismatch: the bead sits visibly loose inside the rim even at maximum safe pressure, the tire won’t hold air overnight despite fresh sealant, or the bead never actually pops — it just climbs partway up and stalls.
Check two things. First, measure your rim’s inner width with calipers and cross-reference it against the tire width recommendation printed on the sidewall or listed on the manufacturer’s site. Second, consult the official compatibility chart — Schwalbe publishes one, Specialized publishes one, Pirelli does too. These exist for a reason.
If the numbers don’t align and the bead still refuses after completing every step above, the combination isn’t safe to ride. Swap one component — either the tire or the rim — and start fresh. That’s not defeat. That’s just mechanics.

Stay in the loop
Get the latest bike maintenance pros updates delivered to your inbox.