A dedicated home bike workshop transforms maintenance from a chore into a pleasure. No more dragging bikes through the living room or crouching in the driveway. With the right setup, every repair becomes faster, cleaner, and more enjoyable. This guide covers everything from essential tools to workshop layout to budget considerations.
This article includes affiliate links. We may earn a commission at no extra cost to you.
Location Selection
Your workshop needs to fit your living situation. Each option has trade-offs:
Garage Corner
Most common choice. Benefits include existing electrical outlets, concrete floor for heavy work, and separation from living spaces. Drawbacks: temperature extremes, shared space with vehicles, and potential for grease transfer to cars.
Dedicate at least a 6×8 foot area. This provides room for a workbench, bike stand, and movement around the bike. A folding workbench expands this area when not in use.
Basement
Temperature-controlled and out of the way. Great for detailed work. Challenges include transporting bikes up and down stairs and potential moisture issues in older basements. A dehumidifier solves the moisture problem; a bike hoist helps with transport.
Dedicated Outbuilding
The dream scenario—a shed or small structure entirely for bikes. Requires more investment but provides complete separation. Consider insulation if you live in extreme climates. Running electricity to an outbuilding may require permits.
Apartment Solutions
Limited space requires creativity. A wall-mounted repair stand that folds flat, a small rolling tool cart, and a drop cloth for floor protection make apartment wrenching possible. Store tools in a closet when not in use.
Essential Infrastructure
Before buying tools, address infrastructure:
Flooring
Concrete works but gets cold and hard on feet during long sessions. Options:
- Anti-fatigue mats: $30-100. Reduce leg fatigue significantly.
- Interlocking floor tiles: $2-4 per square foot. Easy cleanup, some insulation from cold concrete.
- Epoxy coating: $100-300 DIY. Seals concrete, resists oils and chemicals, easy to clean.
At minimum, use a large mat where you stand at the workbench.
Lighting
Garages and basements are typically under-lit. Add lighting above the workbench and above the bike stand location. LED shop lights run $20-40 each and mount easily. Natural light helps significantly—maximize window use or add skylights if possible.
Consider a portable work light ($15-30) for illuminating dark corners of bikes during repairs.
Power
You need outlets for work lights, possibly a compressor, and charging devices. A single 15-amp circuit typically suffices unless you’re running air tools or welding equipment. A power strip with surge protection keeps everything accessible.
Climate Control
Extreme temperatures make workshop time miserable. Options by budget:
- Minimal: Portable space heater for winter, fan for summer ($30-50)
- Moderate: Wall-mounted electric heater plus ceiling fan ($150-300)
- Ideal: Mini-split HVAC system ($1000-3000 installed)
Even minimal climate control dramatically extends usable workshop time.
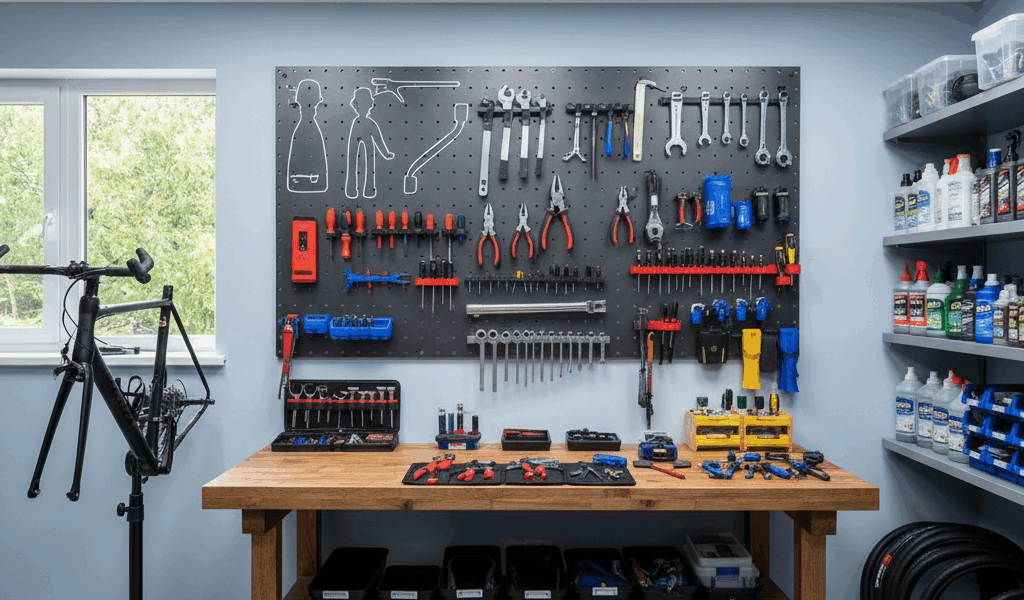
The Workbench
A solid workbench is the heart of the workshop. It holds tools, provides a work surface, and anchors the repair stand.
Size Recommendations
For most home mechanics:
- Length: 5-6 feet minimum. Longer is better.
- Depth: 24-30 inches provides adequate work surface.
- Height: 34-38 inches depending on your height. Standing comfortably is essential.
Building vs. Buying
DIY workbench: A simple 2×4 frame with 3/4″ plywood top costs $100-200 in materials. Countless plans available online. Main advantage: custom sizing for your space.
Commercial workbenches: Range from $200 basic steel to $1000+ for heavy-duty options. Benefits include integrated storage and sturdy construction. Husky, Craftsman, and Gladiator make solid mid-range options.
Repurposed furniture: Old kitchen islands, solid wood tables, or metal shop tables from estate sales work well. Just verify they’re sturdy enough for clamping and pounding.
Surface Material
Plywood works but absorbs oils and becomes grimy. Options to improve it:
- Hardboard overlay: $20 per sheet, replaceable when worn
- Butcher block: Beautiful and durable but expensive
- Laminate counter offcuts: Check local countertop shops for cheap remnants
- Stainless steel: Professional but costly
The Repair Stand
A good repair stand elevates bike maintenance from frustrating to enjoyable. Holding the bike at comfortable height, with both hands free, transforms every task.
Stand Types
Tripod floor stands: Most common for home use. Park Tool PCS-10.3 ($150) sets the standard. Folds for storage, adjustable height, rotates bike for access. Clamps around seatpost or top tube.
Wall-mounted stands: Save floor space. Swing out when needed, fold flat when not. Feedback Sports Velo Wall ($100) and Park Tool PRS-4 ($200+) are popular options. Require drilling into studs.
Workbench-mounted stands: Clamp to bench edge. Good for dedicated workbenches. Park Tool PRS-2 ($200) is the classic, though it requires a very sturdy bench.
Through-axle adapters: Many modern bikes have through-axle dropouts that don’t work with traditional clamps. Adapters ($20-50) hold the bike by the rear axle instead. Check if your stand needs one.
Clamp Considerations
Traditional stands clamp the seatpost or top tube. This works for most bikes but presents problems:
- Carbon seatposts and frames can be damaged by aggressive clamping
- Aero seatposts don’t fit standard clamps
- Integrated seatposts on some frames have no tube to clamp
Solutions: clamp around the seatpost with lighter pressure, use a sacrificial post for clamping, or use a fork/axle mount instead.
Essential Tools
Start with fundamentals. Expand as needed for specific repairs.
Hex Wrenches
Modern bikes use primarily hex bolts. Quality matters—cheap hex wrenches round out quickly, damaging bolt heads.
- Minimum: Y-wrench with 4mm, 5mm, 6mm ($15)
- Better: Full L-wrench set 2mm-10mm with ball ends ($30-50)
- Best: Park Tool or Wera set with holder ($60-100)
Ball-end hex wrenches allow angled access—worth the premium for hard-to-reach bolts.
Torx Wrenches
Disc brake rotors and some newer components use Torx instead of hex. T25 is most common. A basic Torx set ($15-25) covers everything you’ll encounter.
Screwdrivers
Phillips #1 and #2, plus a couple flat heads. Many limit screws and older components still use Phillips. Quality matters—cheap screwdrivers cam out and damage heads.
Wrenches
8mm, 9mm, 10mm, 15mm cover most bike-specific needs. Combination wrenches (box end plus open end) are most versatile. Cone wrenches—thin, flat wrenches—are needed for hub adjustment.
Chain Tools
- Chain breaker: Essential for chain replacement ($15-30)
- Chain wear gauge: For measuring stretch ($10)
- Quick-link pliers: Makes master link work easy ($15)
Cassette Tools
- Chain whip: Holds cassette during removal ($15-25)
- Lockring tool: Matches your hub type—Shimano/SRAM or Campagnolo ($10-20)
- Adjustable wrench: To turn the lockring tool
Tire Tools
- Tire levers: Quality plastic won’t damage rims ($5-10 for set)
- Floor pump: With pressure gauge. Lezyne, Topeak, Park Tool all make good ones ($40-80)
- Tubeless kit: Syringe, valve core tool, sealant if running tubeless
Cleaning Supplies
- Degreaser: Citrus-based works well and is less harsh. Simple Green, Finish Line, Muc-Off.
- Brushes: Stiff brush for drivetrains, soft brush for frames. Toothbrushes work for details.
- Chain cleaning tool: Optional but effective. Park Tool CM-5.3 is the classic.
- Rags: Endless supply needed. Old T-shirts, shop towels, or microfiber.
Intermediate Tools
Add these as your skills and needs expand:
Torque Wrench
Essential for carbon components and precise assembly. A beam-style torque wrench ($25-40) works but requires careful reading. Click-type wrenches ($50-150) are easier and more accurate. Get one that covers 3-15 Nm range—most bike torque specs fall there.
Bottom Bracket Tools
BB tools are annoyingly specific to BB type. Identify what you have:
- BSA threaded: Shimano-compatible tool ($15-25)
- Press-fit: Bearing press and removal tool ($50-100)
- SRAM DUB: Specific cup tool ($20)
If you only have one BB type across your bikes, one tool suffices. Multiple bikes with different BBs require a larger investment.
Headset Press
For installing headset cups. Park Tool HHP-3 ($100) is the standard. A DIY threaded rod setup also works for occasional use.
Wheel Truing Stand
If you build or maintain wheels, a truing stand saves immense time. Park Tool TS-2.2 ($200) is the shop standard. Budget options from Feedback Sports and others run $80-150. A wheel can be trued in-frame without a stand, but dedicated stands are far more precise.
Spoke Wrench
Matches your spoke nipple size. Most use 3.2mm, 3.4mm, or 3.5mm. A multi-size spoke wrench ($8-15) covers all three.
Advanced/Specialty Tools
These serve specific purposes—buy only when needed:
- Crown race setter: Installing headset crown race ($50+)
- Headset cup remover: Removing pressed cups ($40+)
- Derailleur hanger alignment tool: Straightening bent hangers ($60+)
- Cable cutters: Clean cable and housing cuts ($30-50)
- Bleeding kits: Brand-specific for hydraulic brakes ($30-50)
- Bearing presses: Wheel bearings, pivots, bottom brackets ($50-200)
Many advanced tools see use once or twice per year. Consider whether repair cost at a shop exceeds tool cost for infrequent procedures.
Organization and Storage
Tools you can’t find are tools you don’t have. Organization systems matter.
Pegboard
Classic solution. Hang tools visibly above the workbench. Trace tool outlines so you know immediately what’s missing. Pegboard with hooks runs $50-100 for a decent setup.
Tool Chests and Cabinets
Roller cabinets protect tools and provide drawer organization. Harbor Freight and Husky make affordable options ($150-400). Ball-bearing drawer slides matter—cheap slides bind and frustrate.
Wall-Mounted Systems
French cleat systems and commercial options (Gladiator, Craftsman) create modular storage. Move components as needs change. Initial investment is higher but flexibility is valuable.
Parts Organization
Small parts get lost without dedicated storage:
- Parts bins for common fasteners
- Magnetic trays during disassembly
- Labeled zip bags for keeping related parts together
- Old muffin tins for sorting bolts during projects
Budget Considerations
Home workshop costs range dramatically. Here’s a tiered approach:
Minimal Setup ($200-300)
- Folding repair stand ($100)
- Basic hex/Torx set ($40)
- Chain tools ($30)
- Tire tools and floor pump ($50)
- Cleaning supplies ($30)
Workbench: repurposed furniture or plywood on sawhorses. Tools stored in a toolbox.
Solid Home Shop ($600-1000)
- Quality repair stand ($150)
- Complete tool set with carrying case ($150-200)
- Torque wrench ($60)
- Basic workbench ($150-200)
- Lighting upgrade ($50)
- Organization system ($100)
- Specialty tools as needed ($100-200)
Enthusiast Workshop ($2000-4000)
- Professional-grade repair stand ($200-300)
- Comprehensive tool collection ($500+)
- Quality workbench with storage ($400-600)
- Wheel truing stand ($150-200)
- Climate control ($300-500)
- Professional lighting ($150)
- Complete organization system ($200-300)
- Specialty tools inventory ($300-500)
Building Over Time
Don’t buy everything at once. Start with essentials—stand, hex wrenches, tire tools. Add tools as specific repairs demand them. Over years, you’ll accumulate a comprehensive collection without massive upfront expense.
Watch for sales. Park Tool and Feedback Sports regularly go on sale at various retailers. Estate sales and tool swaps turn up quality tools at fraction of retail. Quality tools last decades—buying used quality beats buying new cheap.
Workshop Practices
Beyond tools and infrastructure, good habits matter:
- Clean as you go: Wipe tools before putting away. Sweep floor after messy jobs.
- Return tools to homes: Every tool has a place. Return it there.
- Document repairs: A simple notebook tracks what you did and when. Useful for future reference.
- Keep supplies stocked: Run out of degreaser mid-project is frustrating. Maintain inventory.
- Allow adequate time: Rushing causes mistakes. Start projects with ample time to complete properly.
Conclusion
A home bike workshop scales to your space, budget, and ambitions. Start small, expand thoughtfully, and you’ll develop a space that makes every maintenance task easier. The investment pays itself back quickly in reduced shop bills and increased riding time. More importantly, wrenching becomes something you look forward to rather than dread.
Build your workshop. Build your skills. Keep riding.


Stay in the loop
Get the latest bike maintenance pros updates delivered to your inbox.