Tubeless conversion is the single upgrade that most dramatically improves ride quality while nearly eliminating flats. Yet riders hesitate because they’ve heard horror stories of sealant explosions and endless bead-seating failures. Here’s the reality: with the right approach, tubeless conversion takes 30 minutes and works the first time.
What You Need
Tubeless-ready rims: Most modern wheelsets are tubeless-compatible. Look for “TLR,” “UST,” or “tubeless-ready” designation. Rims designed for tubeless have specific bead hooks and sealing surfaces.
Tubeless-ready tires: Same designations apply. Non-tubeless tires can sometimes be converted, but success rates drop significantly. Stick with tires designed for tubeless.
Tubeless rim tape: This seals spoke holes. Use proper tubeless tape, not electrical tape or duct tape. Stan’s, Orange Seal, and manufacturer-specific tapes work well.
Tubeless valves: Presta valves with rubber bases that seal against the rim. Match valve length to rim depth.
Sealant: Latex-based sealant (Stan’s, Orange Seal, Finish Line) that coats the tire interior and seals punctures automatically.
Floor pump or compressor: A high-volume floor pump seats most beads. Stubborn combinations may require a compressor or tubeless inflator tank.
The Conversion Process
Step 1: Prep the rim. Remove existing rim tape. Clean the rim bed thoroughly with isopropyl alcohol. Any contamination compromises tape adhesion.
Step 2: Apply tubeless tape. Start opposite the valve hole. Apply tape under tension, covering the entire rim bed plus a few millimeters onto each bead shelf. Overlap the starting point by 4-6 inches. Press firmly, especially over spoke holes.
Step 3: Install the valve. Poke a small hole through the tape at the valve position. Insert the valve from inside, secure the lock ring from outside. Don’t over-tighten—finger-tight plus a quarter turn is sufficient.
Step 4: Mount one tire bead. Seat one bead completely onto the rim. Work around the circumference, pushing the bead into the rim channel (the center depression). This creates slack for mounting the second bead.
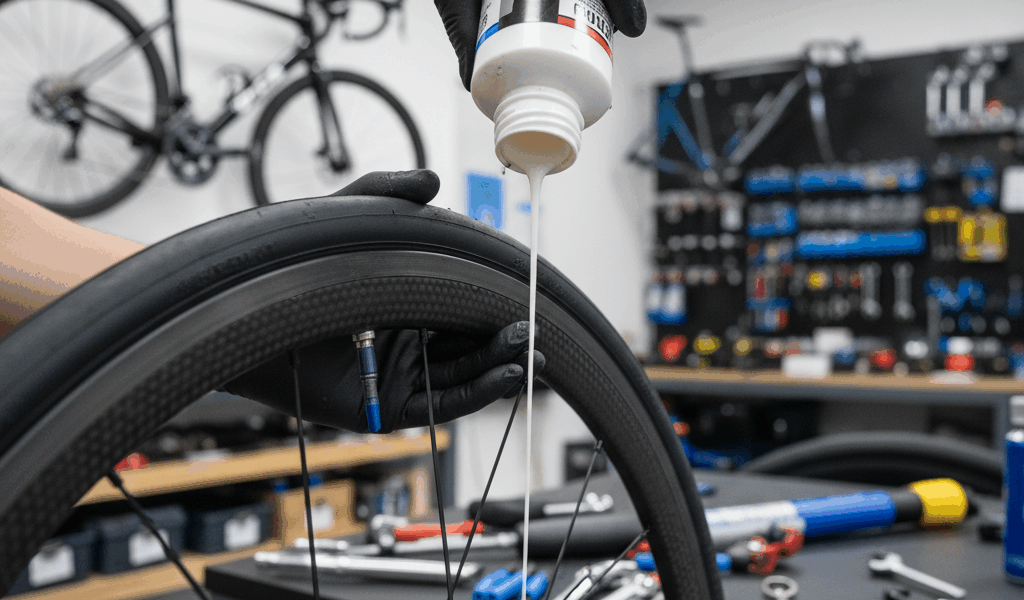
Step 5: Add sealant. Two methods work:
- Before second bead: Pour sealant directly into the tire. 60-90ml for mountain bike tires, 30-60ml for road/gravel.
- Through valve: Remove valve core after mounting. Inject sealant via syringe. Reinstall core. Less messy but requires core remover tool.
Step 6: Mount second bead. Push the second bead onto the rim, keeping it in the center channel until the last section. The final 6-8 inches will be tight—use tire levers carefully if needed, but avoid pinching the first bead.
Step 7: Inflate and seat. Remove the valve core (if installed) for maximum airflow. Inflate rapidly. You’ll hear loud snapping as the bead seats against the rim hook. Once both beads are seated, reinstall the valve core and inflate to normal pressure.
Step 8: Distribute sealant. Shake the wheel, rotate it, and bounce it. Sealant needs to coat the entire interior. Lay the wheel flat for a few minutes on each side.
Troubleshooting Bead Seating
Air escaping faster than pump can supply:
- Ensure both beads are in the center channel (not on bead shelf)
- Check tape for gaps or wrinkles
- Apply soapy water to help seal the bead during inflation
- Use a compressor or tubeless booster tank
One section won’t seat: That section’s bead may be too tight. Deflate completely, push that section into the center channel, reinflate.
Sealant bubbling through tape: Tape isn’t properly adhered over a spoke hole. Reapply tape with better tension and pressure.
Ongoing Maintenance
Sealant refresh: Every 2-4 months, sealant dries out. Remove valve core, inject fresh sealant, redistribute. Check by deflating and pressing the tire to slosh liquid inside.
Pressure checks: Tubeless tires lose air slowly through the casing. Check weekly and top off as needed.
Seasonal replacement: Swap sealant completely at least once per year. Old sealant becomes chunky and ineffective.
Why Tubeless Is Worth It
Puncture resistance: Sealant plugs holes up to ~5mm instantly while riding. Thorns, glass, and small debris become non-issues.
Lower pressure capability: Without tubes to pinch-flat, you can run 5-15 PSI lower. This improves grip, comfort, and small-bump absorption.
Reduced weight: Tubes weigh 100-200 grams. Sealant adds ~100 grams. Net savings of rotational weight improve acceleration.
Fewer mid-ride repairs: Most punctures seal without stopping. The ones that don’t can be plugged with a tubeless repair kit in minutes.
The 30-Minute Investment
Your first conversion takes longest—maybe an hour while learning. Subsequent wheels take 20-30 minutes. Compare that to fixing multiple flats per season, plus the ride quality improvements, and tubeless conversion is the best time investment you can make.
Don’t wait for another mid-ride flat. Do the conversion this weekend.