How a Rear Derailleur Shift Actually Works
Bike shifting has gotten complicated with all the conflicting advice flying around. So let me break down what’s actually happening mechanically — because once you understand it, diagnosing the problem becomes almost obvious.
Your rear derailleur moves toward smaller cogs by releasing cable tension. The cable itself pulls it toward larger ones. Shifting up — toward smaller, faster cogs — means the derailleur is moving against its own spring pressure. That’s what makes this direction so revealing when something goes wrong. It exposes problems the other direction simply hides.
Most people try to fix cable tension, limit screws, and hanger damage all at once. They end up more confused than when they started. So, without further ado, let’s work through these in order — starting with the thing that causes problems about 70 percent of the time.
Start Here — Check Cable Tension First
Probably should have bolded that heading, honestly. Cable tension is almost always the culprit, and almost always the last thing people check.
I learned this after spending a genuinely embarrassing twenty minutes adjusting limit screws on a friend’s Specialized Allez — a bike that turned out to need exactly one quarter-turn on the barrel adjuster. That was it. Twenty minutes, one quarter-turn. Don’t make my mistake.
Here’s the test. Sit on the bike or have someone hold it steady. Drop the front derailleur to the small ring, move the rear to the largest cog. Now click the shifter once toward smaller cogs. Does it snap up cleanly? Does it drag? Does nothing happen at all? Sluggishness or a full stall moving toward smaller cogs — that’s a tension problem.
Before you touch the barrel adjuster, run your fingers along the cable from the shifter down to the pinch bolt at the derailleur body. You’re feeling for kinks or fraying. A kinked cable won’t move smoothly no matter what else you adjust — it needs replacing, full stop. No barrel adjuster in the world fixes a damaged cable.
If the cable looks clean, find the barrel adjuster. It’s the threaded collar where the cable housing meets the derailleur body. Turn it counterclockwise in quarter-turn increments, testing the shift after each one. You want just enough tension that the derailleur snaps up without hesitation — not so much that it drifts or overshoots.
The fix is usually tiny. Three or four quarter-turns handles most cases. If you’re approaching two full rotations and nothing’s improving, stop. You’re past a tension issue — look harder at the cable itself.
Check and Adjust the High Limit Screw
But what is the high limit screw? In essence, it’s a physical stop that prevents the derailleur from traveling too far toward your smallest cog. But it’s much more than that — set it too tight and no amount of cable tension adjustment will get you into that gear. The derailleur simply hits a wall.
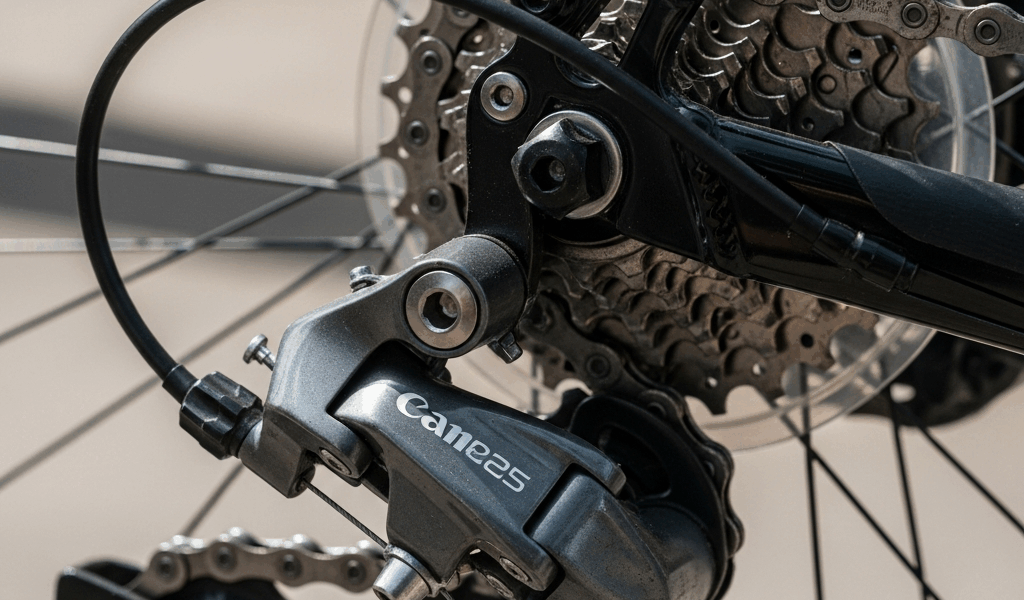
Most derailleurs stamp an H right on the screw — Shimano, SRAM, Campagnolo all do this. Shift to your smallest cog and watch the cage. Does it reach and align cleanly? Or does it fall short by a visible gap? Short means the H screw is too tight.
Turn it counterclockwise in half-turn increments. Check alignment after each one. The cage should sit parallel to the cassette, tracking the chain without any rubbing. That’s your target.
This symptom feels different from cable tension issues — worth knowing. With tension problems, the derailleur tries to move but feels soft or sluggish. With the limit screw? It doesn’t try. It just stops. That distinction saves a lot of diagnostic time.
A word of genuine caution here: back the H screw out too far and the chain drops off the small cog onto your frame. On a carbon frame, that’s a bad afternoon. Adjust conservatively, test every single time, and stop the moment shifting works cleanly.
Inspect the Derailleur Hanger for Damage
Probably should have opened with this section, honestly. A bent derailleur hanger is the diagnosis home mechanics skip — they spend time on cables and limit screws first, then find a bent hanger at the end. I’ve done it. It’s frustrating.
The hanger is the small replaceable arm that bolts to your dropout and holds the entire derailleur body. Bend it — usually from a tip-over or a stick through the wheel — and the derailleur sits at an angle to the cassette. Shifting becomes inconsistent across multiple gears, especially toward the smallest cogs.
Checking it takes thirty seconds. Crouch directly behind the bike, eye-level with the cassette. Sight the derailleur cage against the cogs. Parallel is correct. Angled inward or outward — even slightly — means the hanger is bent.
A hanger alignment tool — something like the Park Tool DAG-2.2, which runs around $85 — is the proper fix. Some shops will loan one or straighten it for $10 to $15. But if the bend is obvious just from sighting, you’ve already found your problem.
Hangers are designed to be sacrificial parts. They’re cheap — most run $8 to $20 depending on the frame — and most bikes use one of a handful of standard designs. Order the right one, bolt it on. Five-minute job. The derailleur itself is almost certainly fine.
When the Problem Is the Derailleur Itself
Cable tension is good. Limit screw is set correctly. Hanger is straight. If you’ve checked all three and shifting still won’t behave, you’re looking at the derailleur body itself — either worn pivot bushings or a damaged cage.
Flex the cage side to side with your hand. It should move with mild resistance and spring back. Wobbles loosely with almost no resistance? The pivot bushings are worn out. This happens fast on budget derailleurs — I’m apparently hard on components, and the Tourney-level stuff never lasts more than a season of regular riding for me while mid-range Deore works fine for years. Worn pivots mean the derailleur can’t hold position accurately, and shifting suffers across the whole cassette.
Next, sight the upper and lower pulley wheels. They should form a straight vertical line. Bent inward, twisted, obviously off-axis — that’s cage damage, usually from a crash. And here’s the thing about bent cages: replacing beats straightening every time. I once spent forty minutes trying to cold-bend a cage back to true on a Shimano 105. Made it worse, snapped a pulley bolt, and replaced the whole derailleur anyway. The metal work-hardens. It doesn’t want to cooperate. Just replace it.
That’s what makes a fresh mid-range derailleur — something like a Shimano Deore RD-M6100 at around $40 to $50 — so appealing to us home mechanics. It costs less than the time you’d waste trying to resurrect a damaged one.
Quick Reference — Diagnostic Order
- Check cable for kinks or fraying
- Adjust barrel adjuster for cable tension (quarter-turn increments)
- Test and adjust the H limit screw
- Inspect derailleur hanger alignment by sighting from behind
- Check derailleur cage for bending or pivot looseness
Work through that list in order and you’ll land on the problem without chasing ghosts. Most of the time — genuinely, most of the time — you won’t need to replace a single part.


Stay in the loop
Get the latest bike maintenance pros updates delivered to your inbox.