Why Your Front Derailleur Won’t Drop to a Smaller Ring
Front derailleur troubleshooting has gotten less clear-cut with all the conflicting advice flying around. As someone who’s stood at the side of a climb watching a riding partner frantically thumb a shifter that refused to cooperate, I put in the hours studying why the chain won’t drop inward. Today, I will share it all with you.
This article includes affiliate links. We may earn a commission at no extra cost to you.
Three things cause this about 90% of the time. Slack cable. A low limit screw wound too tight. Or a cage that’s bent, twisted, or sitting at the wrong height. That’s it. So, without further ado, let’s dive in — and I promise this diagnosis takes under ten minutes if you stay disciplined about the order.
Check Cable Tension Before Anything Else
Frustrated by a stubborn front end that wouldn’t drop to the small ring, I once spent forty minutes turning limit screws on a Shimano 105 FD-5800 derailleur that had absolutely nothing wrong with its adjustment. Dead cable. Completely slack. I could twist the barrel adjuster until my fingers cramped and nothing moved — because the derailleur never got the signal in the first place. Save yourself the trouble I had.
Here’s the core issue. Pulling the shift lever is supposed to shorten the cable, which pulls the derailleur cage inward toward the small chainring. Stretched cable, frayed cable, or cable installed with too much initial slack means the cage never travels far enough. The chain just sits there on the big ring. You shift again. Same result.
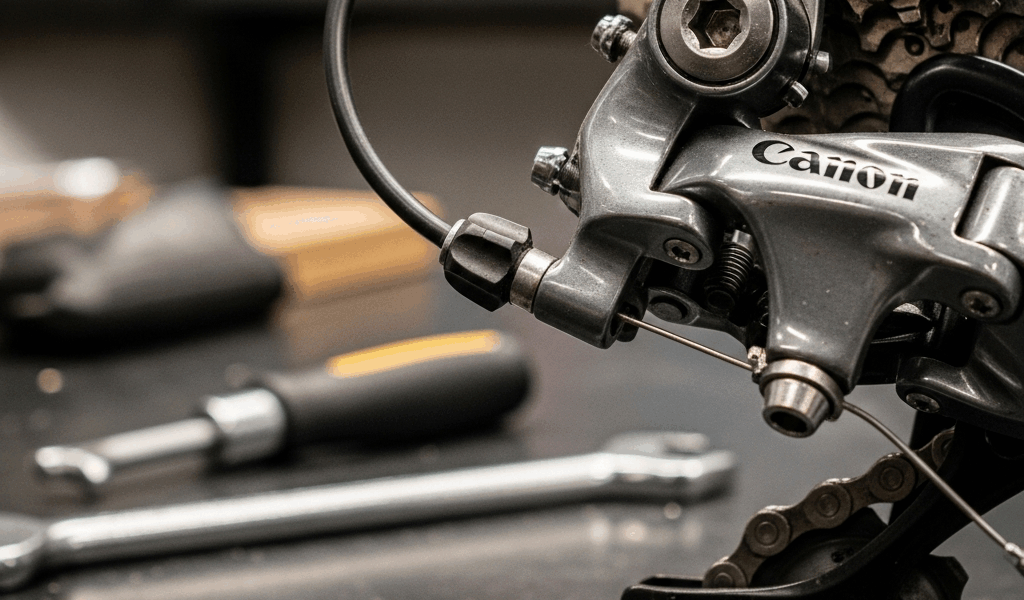
Find the pinch bolt — it’s usually on the underside of the derailleur body, a single bolt you’ll crack open with a 3mm hex key. Loosen it. Now grab the cable housing with one hand and the bare cable with the other and pull hard. Firm and taut is what you want. Floppy or spongy means trouble.
If it feels loose, re-seat it. Pull the cable taut by hand, hold it there, and retighten the pinch bolt. Easier on newer bikes with sealed housing. Harder on older steel frames where the cable may have kinked during a winter in storage — and a kinked housing will bleed tension no matter how aggressively you pull.
Next, the barrel adjuster. On most road and gravel setups this is a ribbed plastic knob, either at the lever end of the housing or mounted directly on the derailleur body itself. Turn it counterclockwise — away from you — in quarter-turn increments. Each quarter-turn pulls a small amount of slack out of the system and increases inward pull on the cage.
Stop after every quarter-turn. Try the downshift. Chain drop to the small ring? Good — you’re done here. No drop? Turn again. Slowly. This part rewards patience.
Barrel adjuster fully counterclockwise and still nothing? The cable itself is compromised or the pinch bolt isn’t gripping. Time for cause number two.
How to Adjust the Low Limit Screw Correctly
Quick note before the rest of this. It’s faster to locate than a cable issue. But the slack-cable trap catches too many people, so I wanted that out of the way first.
But what is the low limit screw? In essence, it’s a physical stop — a small machine screw that prevents the derailleur cage from swinging past the small chainring and sending the chain into the bottom bracket shell. But it’s much more than that. Set it even a fraction too tight and it becomes a wall that keeps the cage from traveling inward at all, regardless of how much cable tension you have.
Most derailleur bodies have the L and H screws labeled in white or red paint. The L screw sits on the inboard side of the cage mounting bracket. I’m apparently sensitive to overtightening and a quarter-turn past ideal works for me while backing off further never does — so go slowly here.
Shift to the big ring first. This releases cable tension and gives you room to work. Then loosen the L screw in quarter-turn increments using a small Phillips or flathead — whichever the derailleur takes. Watch the inner edge of the cage as you turn. It should drift outward, away from the chainrings, as you loosen.
After each quarter-turn, try the downshift. The moment the chain drops cleanly onto the small ring, stop. Full stop. Do not keep turning.
That’s what makes the limit screw endearing to us mechanics — it’s precise. One quarter-turn past ideal and the chain overshoots entirely, falling off the small ring onto the bottom bracket shell. Now you’ve built a second problem on top of the first. The visual target: chain seated on the small ring with roughly 2mm of clearance between the cage’s inner plate and the chainring teeth. Not rubbing. Not touching. Just clear.
L screw fully backed out and cage still won’t swing inward? The screw isn’t your problem. Go back to the cable check or move forward to the cage itself.
Cage Alignment — the Fix Nobody Tries First
The derailleur cage is a hunk of aluminum — stamped or forged, depending on the groupset — that has to sit in a very specific orientation to function. Parallel to the chainrings. Roughly 1 to 3mm above the teeth of the big ring. Deviate from that and chain guidance breaks down completely.
Stand beside the bike and look down at the derailleur from above. The cage should look like it belongs to the same plane as the chainrings. Angled outward — twisted away from the frame — means the inner edge of the cage won’t line up with the small ring, and the chain has nowhere to go when you try to drop it.
This is almost always a crash problem. A hard fall can shift the mounting bracket where the derailleur clamps to the seat tube. I have seen a rider spend an hour fighting a cage that had been knocked 5mm out of position by a low-speed tip-over in a parking lot. The whole derailleur body had rotated. No amount of limit screw adjustment was ever going to fix that.
Visibly bent or twisted cage? That derailleur needs replacing. A new Shimano 105 FD-R7000 runs around $45 to $60. A Ultegra FD-R8000 is closer to $90 to $110. No adjustment recovers a bent cage — the geometry is gone.
Cage looks straight? Check the height. Loosen the clamp bolt — usually a 5mm hex key — and rotate the entire derailleur body up or down along the seat tube until the outer cage plate sits 1 to 3mm above the big ring teeth. Retighten. Try the shift again.
Still Not Shifting Down — What to Check Next
A worn or dirty chain creates enough drag that the cage can’t push it inward cleanly. Run a degreaser through the drivetrain — I use Muc-Off Bio Degreaser, diluted about 5:1 — and retry. Visibly stretched chain or stiff links? Replace it. A $15 chain is cheaper than a half-hour of chasing a problem that’s literally worn out.
Speed mismatch is a hidden culprit that shows up more than it should. A 9-speed front derailleur on an 11-speed crankset won’t shift predictably. Check your groupset compatibility. Shimano, SRAM, and Campagnolo parts are not interchangeable without specific adapter setups — and even then, results vary.
Seized cable housing is sneaky. It feels normal at the barrel adjuster but the cable isn’t actually traveling inside. Cut the cable, pull it free, and inspect the housing for kinks or blockage. If anything looks wrong, replace both cable and housing together — housing alone is about $8 to $12 per meter, cable is another $6. Not worth reusing one while replacing the other.
Still stuck after all of that? Go back through the three in order. Cable tension. Limit screw. Cage alignment. One of those three is your answer — it always is.

Stay in the loop
Get the latest bike maintenance pros updates delivered to your inbox.