Home Bicycle Repair Guide
Bike repair has gotten complicated with all the YouTube tutorials and forum debates flying around. Everyone’s got an opinion on the “right” way to fix a flat or adjust derailleurs, and half of it contradicts the other half. But here’s the thing — most home bike repairs are actually pretty straightforward once you know the basics. I still remember the first time I tried to patch a tube on my apartment floor. Let’s just say duct tape was involved, and no, it didn’t hold. Let me save you that embarrassment.
Tools You’ll Need
Before you start tearing anything apart, make sure you’ve got these basics on hand. You don’t need a full-on pro shop setup — just a solid starter kit will get you through most of what comes up.
- Allen wrenches (various sizes)
- Screwdrivers (flat-head and Phillips)
- Tire levers
- Patch kit for tubes
- Chain tool
- Lubricant (wet or dry)
- Rags
- Bike pump with pressure gauge
Honestly, a decent set of Allen wrenches and a good pump will get you through about 80% of home repairs. The rest fills in the gaps when things get a bit more involved.
Checking and Inflating Tires
This one’s so basic that people skip right over it. And then they wonder why their ride feels sluggish or they keep getting flats. Check the sidewall of your tires — there’s a recommended pressure range printed right there. Grab your pump (one with a gauge, please) and fill them up. Not rock-hard, not squishy. Just right in that sweet spot.
While you’re at it, give the tread a once-over. See any little bits of glass or gravel embedded in there? Pick them out now, before they work their way through and give you a flat on next Saturday’s ride.
Repairing a Flat Tire
Flat tires happen to everyone. Don’t panic. Pop the wheel off the bike, then use your tire levers to ease the tire off the rim. No need to go full Hulk on it — gentle pressure works fine. Once the tube is out, inflate it a little and listen for the hiss of escaping air. Found the puncture? Mark it with a pen so you don’t lose track of it.
Now rough up the area around the hole with the sandpaper from your patch kit. Dab some glue on, wait until it gets tacky (patience here, don’t rush), then press your patch down firmly. Give it a minute to set. Put the tire back together, pump to the right pressure, and you’re good to go. Probably should have led with this — flat repair is the single most useful skill any cyclist can learn. It’ll keep you from walking your bike home more times than you’d expect.
Cleaning and Lubricating the Chain
A grimy chain is a sad chain. It shifts poorly, wears out faster, and makes that annoying grinding noise nobody wants to hear on a group ride. Here’s the fix: grab a rag, wrap it around the chain, and pedal backwards to wipe off all the old gunk and dirt. Then apply fresh lube — just a thin line along the chain while you slowly rotate the pedals. Wipe off the excess with a clean rag afterward. You want lube inside the links, not coating the outside like it’s been deep-fried.
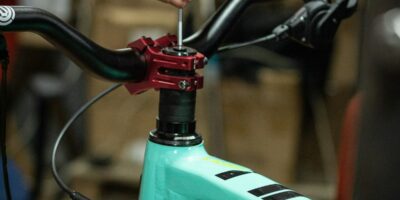
Adjusting the Brakes
Good brakes are non-negotiable. If you can squeeze the lever all the way to the handlebar and nothing much happens, that’s a problem you want to sort out before your next ride — not during it.
For rim brakes, make sure the pads actually line up with the rim surface. Loosen the pad bolts, position them where they need to be, and retighten. Then check cable tension by squeezing the brake lever — it should bite about halfway through the pull. Use the barrel adjuster near the lever to dial it in. It takes a little trial and error the first time, but once you get the feel for it, it’s quick work.
Disc brakes are a different animal. Check the pad thickness — if they’re worn thin, swap them out. And take a look at the rotor while you’re at it. If it’s warped (you’ll hear it rubbing), you can try straightening it with a rotor truing tool, or just replace it if things have gone too far.
Ensuring Smooth Gear Shifting
Nothing kills a good ride like gears that skip, ghost-shift, or just plain refuse to cooperate. Want to know how to fix that? Start by shifting to the smallest chainring and the smallest rear sprocket. From there, turn the barrel adjuster on the derailleur to fine-tune cable tension. You want the derailleur cage sitting parallel to the chain — if it’s bent, well, that’s your problem right there.
For the rear derailleur, adjust the high and low limit screws so the chain can’t overshoot and fall off either end of the cassette. Do the same for the front derailleur to keep the chain from dropping off the chainrings. It’s a bit fiddly at first, but once you get the hang of it, the whole process takes maybe five minutes.
Tightening Bolts and Fasteners
Here’s one that sneaks up on people. Bolts loosen over time — vibration does that. Every few weeks, grab your Allen wrenches and do a quick check on the stem, handlebars, seat post, and crank bolts. Snug them up, but don’t go full gorilla on them. Stripped threads are way worse than a slightly loose bolt. Got a torque wrench? Even better — use the manufacturer’s recommended torque specs.
Checking the Wheels
Spin each wheel and watch it carefully. Does it wobble from side to side? That means it needs truing. Grab a spoke wrench and gently tighten or loosen the spokes on the opposite side of the wobble. Small adjustments only — quarter turns at a time. Check your progress as you go.
If the wheel is really out of whack and you’re not feeling confident about it, take it to a shop. Wheel truing is one of those things where a little knowledge can actually make things worse if you overdo it.
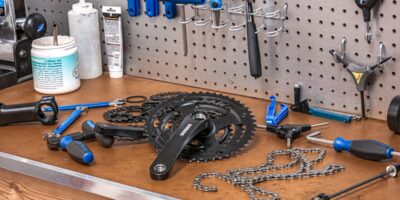
Maintaining the Drivetrain
Your drivetrain is basically the engine of your bike — chain, chainrings, cassette, and derailleurs all working together. Keep them clean and lubed up. That’s what makes a well-maintained drivetrain endearing to anyone who values a quiet, efficient ride. Pay special attention to chain wear. Chains stretch over time (technically the pins wear down, but the effect is the same), and a stretched chain chews up your cassette and chainrings faster than you’d think. Pick up a chain checker tool — they’re cheap and dead simple to use. If it says the chain is done, replace it before it takes your cassette with it.
Checking the Bottom Bracket
The bottom bracket is that hidden bearing assembly connecting your cranks to the frame. If you’re hearing clicking or grinding while you pedal, this might be the culprit. Grab a crank arm and try wiggling it side to side. Any noticeable play or looseness? Time to adjust or replace it. This repair can get a bit more involved depending on the type of bottom bracket you’ve got, but at minimum you should know how to check for the problem.
Inspecting the Frame and Fork
Every now and then, give your frame a proper look-over. Check around the welds, the head tube junction, and anywhere that takes repeated stress. Riding carbon? Watch for any signs of cracking or delamination — run your fingers along the tubes and feel for anything unusual. Any cracks or visible damage? Don’t ride it. Get it checked out by a pro immediately. Frame failure mid-ride is not something you ever want to experience firsthand.
Keeping the Bike Clean
A clean bike just works better. Period. Grab some warm water and mild soap, a sponge or soft brush, and go to town. Skip the pressure washer, though. Blasting water into your bearings and headset is a fast track to expensive problems down the road. Dry everything off with a rag when you’re done and re-lube the chain and other moving parts.
Storage Tips
Where you keep your bike matters more than most people realize. Indoor storage is ideal — a wall hook or a simple floor stand works great. If you have to leave it outside, cover it with a weatherproof cover, but make sure the bike is dry first. Otherwise you’re basically wrapping it in a little humidity tent, and rust absolutely loves that.
A little regular attention goes a long way. Keep up with these basic checks and your bike will reward you with smooth, trouble-free rides for years. It’s honestly not that hard once you build the habit — and your wallet will thank you for not paying shop labor rates on stuff you can handle in your own garage.