
Bicycle Repair for Beginners
Bicycle Repair for Beginners
I bought my first “real” bike about five years ago and immediately took it to a shop every time something felt off. Weird noise? Shop. Gears skipping? Shop. Tire felt soft? Honestly, shop. My mechanic eventually laughed and said, “You know you can do most of this yourself, right?” He was right. And once I started learning the basics, I realized how much money I’d been handing over for ten-minute fixes. So if you’re new to this, here’s everything I wish someone had told me from the start.
Essential Tools
- Multi-tool
- Bike pump
- Tire levers
- Patch kit
- Chain lubricant
- Hex keys (Allen wrenches)
- Screwdrivers
Fixing a Flat Tire
Flat tires are going to happen. It’s not a matter of if, it’s when. The good news is this is one of the easiest repairs to learn. Remove the wheel from the bike, then use tire levers to pop the tire off the rim. Pull out the inner tube and inflate it a little — listen for hissing or feel for air escaping with your hand near the surface. Once you find the hole, slap on a patch. If the tube looks really beat up or has multiple punctures, just replace it. A new tube costs a few bucks and isn’t worth the hassle of patching six holes.
Adjusting Brakes
Properly working brakes are pretty important — I shouldn’t have to say that, but here we are. If your brakes feel loose or grabby, start with the cable tension. Turn the barrel adjuster on the brake lever to tighten things up. For bigger adjustments, use a hex key to loosen the bolt holding the brake cable at the caliper, pull the cable tighter or give it some slack, then retighten. Make sure your brake pads line up with the rim and aren’t dragging on the tire. Pads rubbing the tire will eat through it faster than you’d believe.
Lubricating the Chain
A well-lubed chain is the difference between a bike that purrs and one that sounds like it’s in pain. Clean the chain first — wipe it down with a rag and some degreaser to strip off the old gunk. Then apply chain lube sparingly, one link at a time while turning the pedals. Wipe off any excess. Seriously, wipe it off. Extra lube sitting on the chain just collects dirt and grit, and then you’ve got liquid sandpaper grinding away at your drivetrain.
Fixing Chain Issues
If your chain slips or feels too loose, it probably needs attention. Press down on the chain about halfway along its length between the chainring and rear cog. There should be just a little bit of give — maybe half an inch. If it sags way down, the chain might be too long and need a link removed. Use a chain tool for that. If the chain slips frequently under load, especially when you’re pedaling hard uphill, it’s probably stretched and needs replacing altogether. Chains are cheap compared to cassettes and chainrings, so don’t put off replacement.
Wheel Truing
Probably should have led with this because a wobbly wheel affects basically everything — braking, handling, tire wear. If your wheel wobbles, it needs truing. Put the bike in a stand (or flip it over). Spin the wheel and watch where it deviates. Use a spoke wrench to tighten spokes on the side where the wheel pulls away and loosen on the opposite side. Work slowly, a quarter turn at a time. Check your progress constantly. Overtightening is just as bad as undertightening. It’s a skill that gets easier every time you do it.
Maintaining Tires
Good tire pressure reduces flats and makes pedaling easier. Check your pressure with a gauge — the number you’re shooting for is printed on the tire sidewall. Get in the habit of checking before rides, or at least once a week. While the tire’s off the ground, run your eyes and fingers over the tread looking for cuts, embedded glass, or small rocks wedged in. Pull anything out before it works its way through to the tube. Replace tires that have cracks, bald spots, or sidewall damage. A blown tire at speed is no joke.
Gear Shifting Adjustments
When your bike struggles to change gears, it’s usually a cable tension issue. For the rear derailleur, the barrel adjuster is your friend. Small clockwise or counterclockwise turns change the tension just enough to make shifts cleaner. Work through all the gears while making adjustments — it should move smoothly without hesitation or noise at each shift. For the front derailleur, make sure the cage guides the chain between chainrings without rubbing. If it rubs in certain gear combos, a slight tweak to the limit screws or cable tension usually fixes it.
Handlebar and Seat Adjustments
Comfort matters way more than most beginners realize. If your handlebars are too low, your back aches. Too high, and you lose control in turns. Get them at a height that lets you ride with a slight forward lean and relaxed arms. Seat height should let your leg almost fully extend at the bottom of the pedal stroke — you want a slight bend at the knee, not a locked-out leg. Use the right size hex key or wrench for these adjustments and take the bike for a short ride to test before committing to any changes.
Brake Pads Replacement
Worn brake pads don’t stop you well. It’s that simple. Check them regularly — look at the wear indicator lines if they have them, or just eyeball the thickness. If they’re getting thin or the braking surface is glazed and smooth, swap them out. Release the brake cable, unbolt the old pads, and slide in the new ones. Make sure they’re lined up with the rim — not angled, not hitting the tire. Reattach the cable and squeeze the lever a bunch of times to test. You want confident stopping power, not a suggestion of slowing down.
Checking Bolts and Nuts
Loose bolts cause rattles, and rattles lead to things falling off. Do a bolt check every few rides. Handlebars, stem, seat, seatpost clamp, wheel axles, rack mounts, water bottle cage screws — all of them. Tighten anything that feels loose, but don’t go overboard. Overtightening strips threads, cracks carbon parts, and rounds out bolt heads. A torque wrench is a worthwhile investment if you’re working on a nicer bike.
Cleaning Your Bike
Keeping your bike clean isn’t just cosmetic — dirt and grime wear out components faster. Use a soft brush and soapy water on the frame, wheels, and components. Skip the pressure washer. High-pressure water forces dirt and water into bearings, pivot points, and sealed areas where you really don’t want it. Rinse gently, dry everything off, and apply lube to the chain and other moving parts. A clean bike runs better and lasts longer. That’s what makes a regular cleaning routine endearing to riders who want their bikes to go the distance — it’s low effort for high reward.
Inspecting Bearings
Bearings live in your wheels, bottom bracket, and headset. They’re what lets everything spin and rotate smoothly. If you feel grinding, roughness, or resistance when spinning a wheel or turning the handlebars, the bearings need attention. Remove the relevant component, clean the bearings thoroughly, repack with fresh grease, and reassemble. If the bearings are pitted or the races are damaged, replace them. Riding on bad bearings wears out other parts and makes everything feel sluggish.
Emergency Roadside Repairs
Always carry a basic repair kit when you ride. At minimum: spare tube, patch kit, tire levers, a multi-tool, and a small pump or CO2 inflator. With that kit and a little know-how, you can handle most of what the road throws at you. Practice fixing a flat at home before you actually need to do it roadside in the rain. Same goes for brake adjustments and basic derailleur tweaks. Being prepared turns a ride-ending problem into a ten-minute pit stop.
Dealing with Rust
Rust is a bike’s slow enemy. If you spot it early, it’s easy to deal with. Use fine-grit sandpaper or a rust remover to clean affected areas down to bare metal. Hit those spots with a protective coat of paint or clear sealant to keep moisture out. The best defense is prevention — store your bike indoors, dry it off after wet rides, and keep bare metal parts lightly oiled. Steel frames are especially prone to rust if you neglect them.
Inspecting the Frame
Give your frame a visual inspection regularly, especially after hard rides or any kind of crash. Look for cracks, dents, deep scratches, or anything that looks like structural damage. Pay attention to areas around the head tube, bottom bracket shell, and where the seat stays meet the seat tube — stress concentrates at those joints. If you find something suspicious, get a professional to look at it. Riding on a cracked frame is genuinely dangerous and not worth the risk.
Replacing Cables and Housings
Over time, brake and gear cables fray and housing fills up with gunk. When shifting or braking starts feeling stiff and sluggish even after adjustment, new cables and housing usually fix it. Disconnect the old cable, pull it out of the housing, and thread the new one through. Make sure it runs smooth without any kinks. Reconnect, adjust tension, and test. Fresh cables make the whole bike feel sharper and more responsive — it’s one of those cheap upgrades that has an outsized impact on how the bike rides.
Correct Tire Size and Type
Running the wrong tires for your riding style is like wearing dress shoes to go hiking. Road bikes need narrow, high-pressure tires. Mountain bikes need wider, knobby tires with lower pressure. Hybrids sit somewhere in between. Check the numbers on your rim to know what sizes fit, and choose tires that match your actual riding conditions. Rolling resistance, grip, and puncture protection all change depending on the tire, so think about where you ride most before buying.
Understanding Bike Geometry
Bike geometry sounds technical, but it really just comes down to fit. Frame size, top tube length, and seat tube angle all affect how comfortable you are and how efficiently you pedal. A bike that’s too big makes you stretch uncomfortably; too small and your knees are in your chest. Use the manufacturer’s sizing charts as a starting point, and test ride whenever possible. A proper bike fit — even a basic one — makes a massive difference in comfort and performance.
Upgrading Components
Once you’ve got the basics down, upgrading parts can make your bike feel like new. Lighter wheels make climbing easier. Better brake pads give you more stopping confidence. A comfortable saddle saves your backside on long rides. Don’t upgrade everything at once — figure out what bothers you most about the bike and start there. And always check compatibility before buying. Not every part fits every bike, and nothing’s more frustrating than a shiny new component that doesn’t work with your setup.
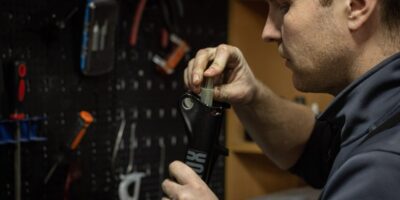
Compression and Suspension Maintenance
If your bike has a suspension fork or rear shock, it needs regular love. Clean the stanchions after every dirty ride — grit on those tubes destroys seals fast. Check for oil leaks around the seals and wiper rings. Follow the manufacturer’s recommended service intervals for full rebuilds. Adjust the compression and rebound damping to match your weight and riding style. Well-maintained suspension soaks up bumps like it’s supposed to. Neglected suspension just feels like riding a pogo stick.
Joining a Bike Community
One of the best things I did as a beginner was join a local cycling group. Group rides teach you tons about pacing, handling, and bike maintenance just through osmosis. Workshops at local bike co-ops are usually free or cheap and let you learn hands-on. Online forums and subreddits are solid resources for specific questions. Other riders have dealt with the same problems you’re facing, and most are happy to share what they’ve learned.
Keeping a Maintenance Log
Keep a simple log of what you do to your bike and when. Note the date, the work performed, and any parts you replaced. It doesn’t need to be fancy — a notebook or a notes app on your phone works fine. This log helps you remember when you last replaced the chain, how many miles are on those brake pads, and when the next cable swap is due. Patterns emerge over time that help you stay ahead of problems instead of reacting to them.
These basics will keep your bike running well for a long time. Regular maintenance isn’t glamorous, but it makes every ride safer, smoother, and more enjoyable. Start with the stuff you’re comfortable with and work your way up from there — before long, you’ll wonder why you ever paid someone else to do this stuff.